Note
Click here to download the full example code
Accelerated video decoding with NVDEC
Author: Moto Hira
This tutorial shows how to use NVIDIA’s hardware video decoder (NVDEC) with TorchAudio, and how it improves the performance of video decoding.
Note
This tutorial requires FFmpeg libraries compiled with HW acceleration enabled.
Please refer to Enabling GPU video decoder/encoder for how to build FFmpeg with HW acceleration.
import torch
import torchaudio

print(torch.__version__)
print(torchaudio.__version__)
2.6.0.dev20241104
2.5.0.dev20241105
import os
import time

import matplotlib.pyplot as plt
from torchaudio.io import StreamReader
Check the prerequisites
First, we check that TorchAudio correctly detects FFmpeg libraries that support HW decoder/encoder.
from torchaudio.utils import ffmpeg_utils
FFmpeg Library versions:
  libavcodec:   60.3.100
  libavdevice:  60.1.100
  libavfilter:  9.3.100
  libavformat:  60.3.100
  libavutil:    58.2.100
Available NVDEC Decoders:
 - av1_cuvid
 - h264_cuvid
 - hevc_cuvid
 - mjpeg_cuvid
 - mpeg1_cuvid
 - mpeg2_cuvid
 - mpeg4_cuvid
 - vc1_cuvid
 - vp8_cuvid
 - vp9_cuvid
print("Avaialbe GPU:")
print(torch.cuda.get_device_properties(0))
Avaialbe GPU:
_CudaDeviceProperties(name='NVIDIA A10G', major=8, minor=6, total_memory=22502MB, multi_processor_count=80, uuid=c2ea4597-4a2d-78c5-bb14-b396bfc31024, L2_cache_size=6MB)
We will use the following video which has the following properties;
Codec: H.264
Resolution: 960x540
FPS: 29.97
Pixel format: YUV420P
src = torchaudio.utils.download_asset(
    "tutorial-assets/stream-api/NASAs_Most_Scientifically_Complex_Space_Observatory_Requires_Precision-MP4_small.mp4"
)
  0%|          | 0.00/31.8M [00:00<?, ?B/s]
 79%|#######9  | 25.2M/31.8M [00:00<00:00, 263MB/s]
100%|##########| 31.8M/31.8M [00:00<00:00, 265MB/s]
Decoding videos with NVDEC
To use HW video decoder, you need to specify the HW decoder when
defining the output video stream by passing decoder option to
add_video_stream() method.
s = StreamReader(src)
s.add_video_stream(5, decoder="h264_cuvid")
s.fill_buffer()
(video,) = s.pop_chunks()
The video frames are decoded and returned as tensor of NCHW format.
print(video.shape, video.dtype)
torch.Size([5, 3, 540, 960]) torch.uint8
By default, the decoded frames are sent back to CPU memory, and CPU tensors are created.
print(video.device)
cpu
By specifying hw_accel option, you can convert the decoded frames
to CUDA tensor.
hw_accel option takes string values and pass it
to torch.device.
Note
Currently, hw_accel option and
add_basic_video_stream()
are not compatible. add_basic_video_stream adds post-decoding
process, which is designed for frames in CPU memory.
Please use add_video_stream().
s = StreamReader(src)
s.add_video_stream(5, decoder="h264_cuvid", hw_accel="cuda:0")
s.fill_buffer()
(video,) = s.pop_chunks()

print(video.shape, video.dtype, video.device)
torch.Size([5, 3, 540, 960]) torch.uint8 cuda:0
Note
When there are multiple of GPUs available, StreamReader by
default uses the first GPU. You can change this by providing
"gpu" option.
# Video data is sent to CUDA device 0, decoded and
# converted on the same device.
s.add_video_stream(
    ...,
    decoder="h264_cuvid",
    decoder_option={"gpu": "0"},
    hw_accel="cuda:0",
)
Note
"gpu" option and hw_accel option can be specified
independently. If they do not match, decoded frames are
transfered to the device specified by hw_accell
automatically.
# Video data is sent to CUDA device 0, and decoded there.
# Then it is transfered to CUDA device 1, and converted to
# CUDA tensor.
s.add_video_stream(
    ...,
    decoder="h264_cuvid",
    decoder_option={"gpu": "0"},
    hw_accel="cuda:1",
)
Visualization
Let’s look at the frames decoded by HW decoder and compare them against equivalent results from software decoders.
The following function seeks into the given timestamp and decode one frame with the specificed decoder.
def test_decode(decoder: str, seek: float):
    s = StreamReader(src)
    s.seek(seek)
    s.add_video_stream(1, decoder=decoder)
    s.fill_buffer()
    (video,) = s.pop_chunks()
    return video[0]
timestamps = [12, 19, 45, 131, 180]

cpu_frames = [test_decode(decoder="h264", seek=ts) for ts in timestamps]
cuda_frames = [test_decode(decoder="h264_cuvid", seek=ts) for ts in timestamps]
Note
Currently, HW decoder does not support colorspace conversion. Decoded frames are YUV format. The following function performs YUV to RGB covnersion (and axis shuffling for plotting).
def yuv_to_rgb(frames):
    frames = frames.cpu().to(torch.float)
    y = frames[..., 0, :, :]
    u = frames[..., 1, :, :]
    v = frames[..., 2, :, :]

    y /= 255
    u = u / 255 - 0.5
    v = v / 255 - 0.5

    r = y + 1.14 * v
    g = y + -0.396 * u - 0.581 * v
    b = y + 2.029 * u

    rgb = torch.stack([r, g, b], -1)
    rgb = (rgb * 255).clamp(0, 255).to(torch.uint8)
    return rgb.numpy()
Now we visualize the resutls.
def plot():
    n_rows = len(timestamps)
    fig, axes = plt.subplots(n_rows, 2, figsize=[12.8, 16.0])
    for i in range(n_rows):
        axes[i][0].imshow(yuv_to_rgb(cpu_frames[i]))
        axes[i][1].imshow(yuv_to_rgb(cuda_frames[i]))

    axes[0][0].set_title("Software decoder")
    axes[0][1].set_title("HW decoder")
    plt.setp(axes, xticks=[], yticks=[])
    plt.tight_layout()


plot()
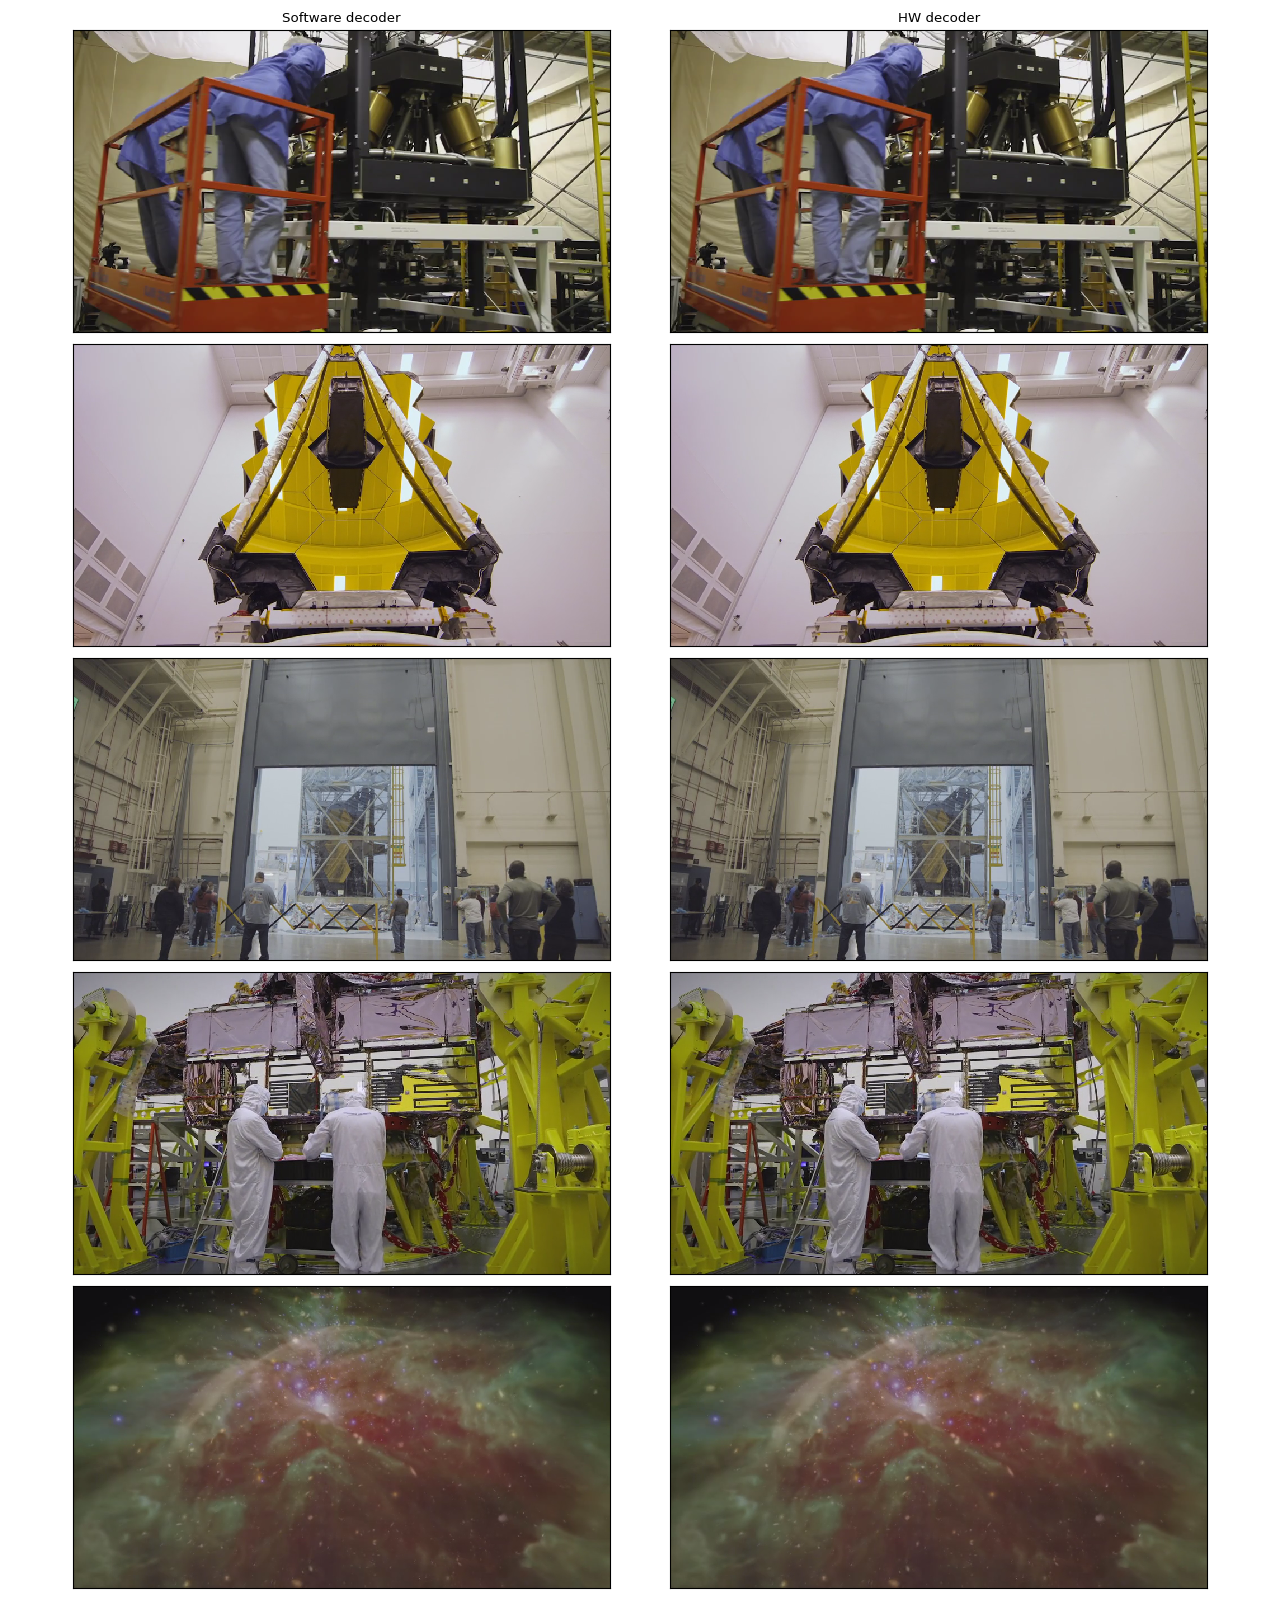
They are indistinguishable to the eyes of the author. Feel free to let us know if you spot something. :)
HW resizing and cropping
You can use decoder_option argument to provide decoder-specific
options.
The following options are often relevant in preprocessing.
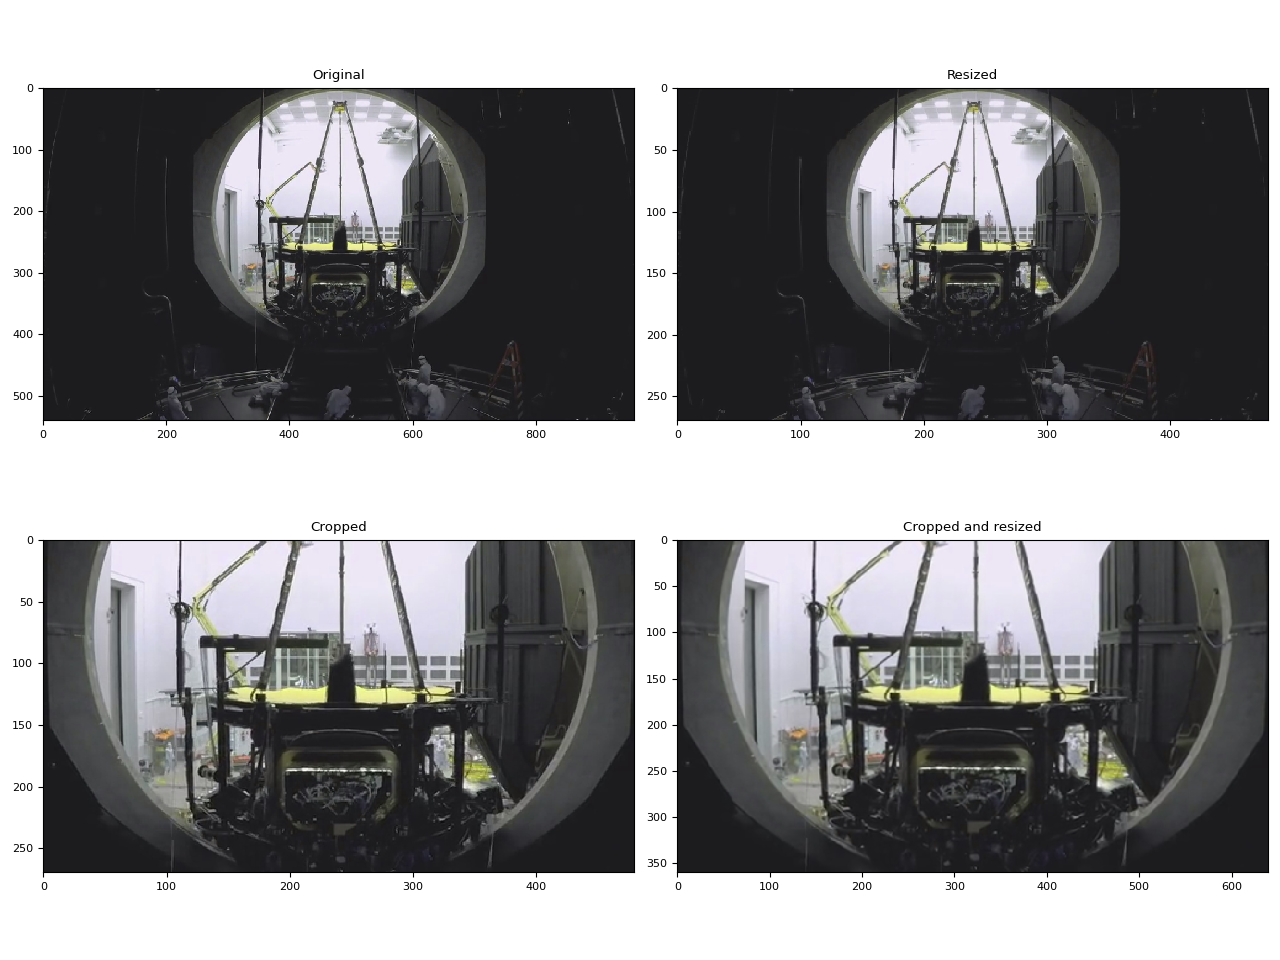
resize: Resize the frame into(width)x(height).crop: Crop the frame(top)x(bottom)x(left)x(right). Note that the specified values are the amount of rows/columns removed. The final image size is(width - left - right)x(height - top -bottom). Ifcropandresizeoptions are used together,cropis performed first.
For other available options, please run
ffmpeg -h decoder=h264_cuvid.
def test_options(option):
    s = StreamReader(src)
    s.seek(87)
    s.add_video_stream(1, decoder="h264_cuvid", hw_accel="cuda:0", decoder_option=option)
    s.fill_buffer()
    (video,) = s.pop_chunks()
    print(f"Option: {option}:\t{video.shape}")
    return video[0]
original = test_options(option=None)
resized = test_options(option={"resize": "480x270"})
cropped = test_options(option={"crop": "135x135x240x240"})
cropped_and_resized = test_options(option={"crop": "135x135x240x240", "resize": "640x360"})
Option: None:   torch.Size([1, 3, 540, 960])
Option: {'resize': '480x270'}:  torch.Size([1, 3, 270, 480])
Option: {'crop': '135x135x240x240'}:    torch.Size([1, 3, 270, 480])
Option: {'crop': '135x135x240x240', 'resize': '640x360'}:       torch.Size([1, 3, 360, 640])
def plot():
    fig, axes = plt.subplots(2, 2, figsize=[12.8, 9.6])
    axes[0][0].imshow(yuv_to_rgb(original))
    axes[0][1].imshow(yuv_to_rgb(resized))
    axes[1][0].imshow(yuv_to_rgb(cropped))
    axes[1][1].imshow(yuv_to_rgb(cropped_and_resized))

    axes[0][0].set_title("Original")
    axes[0][1].set_title("Resized")
    axes[1][0].set_title("Cropped")
    axes[1][1].set_title("Cropped and resized")
    plt.tight_layout()
    return fig


plot()
<Figure size 1280x960 with 4 Axes>
Comparing resizing methods
Unlike software scaling, NVDEC does not provide an option to choose the scaling algorithm. In ML applicatoins, it is often necessary to construct a preprocessing pipeline with a similar numerical property. So here we compare the result of hardware resizing with software resizing of different algorithms.
We will use the following video, which contains the test pattern generated using the following command.
ffmpeg -y -f lavfi -t 12.05 -i mptestsrc -movflags +faststart mptestsrc.mp4
test_src = torchaudio.utils.download_asset("tutorial-assets/mptestsrc.mp4")
  0%|          | 0.00/232k [00:00<?, ?B/s]
100%|##########| 232k/232k [00:00<00:00, 67.9MB/s]
The following function decodes video and apply the specified scaling algorithm.
def decode_resize_ffmpeg(mode, height, width, seek):
    filter_desc = None if mode is None else f"scale={width}:{height}:sws_flags={mode}"
    s = StreamReader(test_src)
    s.add_video_stream(1, filter_desc=filter_desc)
    s.seek(seek)
    s.fill_buffer()
    (chunk,) = s.pop_chunks()
    return chunk
The following function uses HW decoder to decode video and resize.
def decode_resize_cuvid(height, width, seek):
    s = StreamReader(test_src)
    s.add_video_stream(1, decoder="h264_cuvid", decoder_option={"resize": f"{width}x{height}"}, hw_accel="cuda:0")
    s.seek(seek)
    s.fill_buffer()
    (chunk,) = s.pop_chunks()
    return chunk.cpu()
Now we execute them and visualize the resulting frames.
params = {"height": 224, "width": 224, "seek": 3}

frames = [
    decode_resize_ffmpeg(None, **params),
    decode_resize_ffmpeg("neighbor", **params),
    decode_resize_ffmpeg("bilinear", **params),
    decode_resize_ffmpeg("bicubic", **params),
    decode_resize_cuvid(**params),
    decode_resize_ffmpeg("spline", **params),
    decode_resize_ffmpeg("lanczos:param0=1", **params),
    decode_resize_ffmpeg("lanczos:param0=3", **params),
    decode_resize_ffmpeg("lanczos:param0=5", **params),
]
def plot():
    fig, axes = plt.subplots(3, 3, figsize=[12.8, 15.2])
    for i, f in enumerate(frames):
        h, w = f.shape[2:4]
        f = f[..., : h // 4, : w // 4]
        axes[i // 3][i % 3].imshow(yuv_to_rgb(f[0]))
    axes[0][0].set_title("Original")
    axes[0][1].set_title("nearest neighbor")
    axes[0][2].set_title("bilinear")
    axes[1][0].set_title("bicubic")
    axes[1][1].set_title("NVDEC")
    axes[1][2].set_title("spline")
    axes[2][0].set_title("lanczos(1)")
    axes[2][1].set_title("lanczos(3)")
    axes[2][2].set_title("lanczos(5)")

    plt.setp(axes, xticks=[], yticks=[])
    plt.tight_layout()


plot()
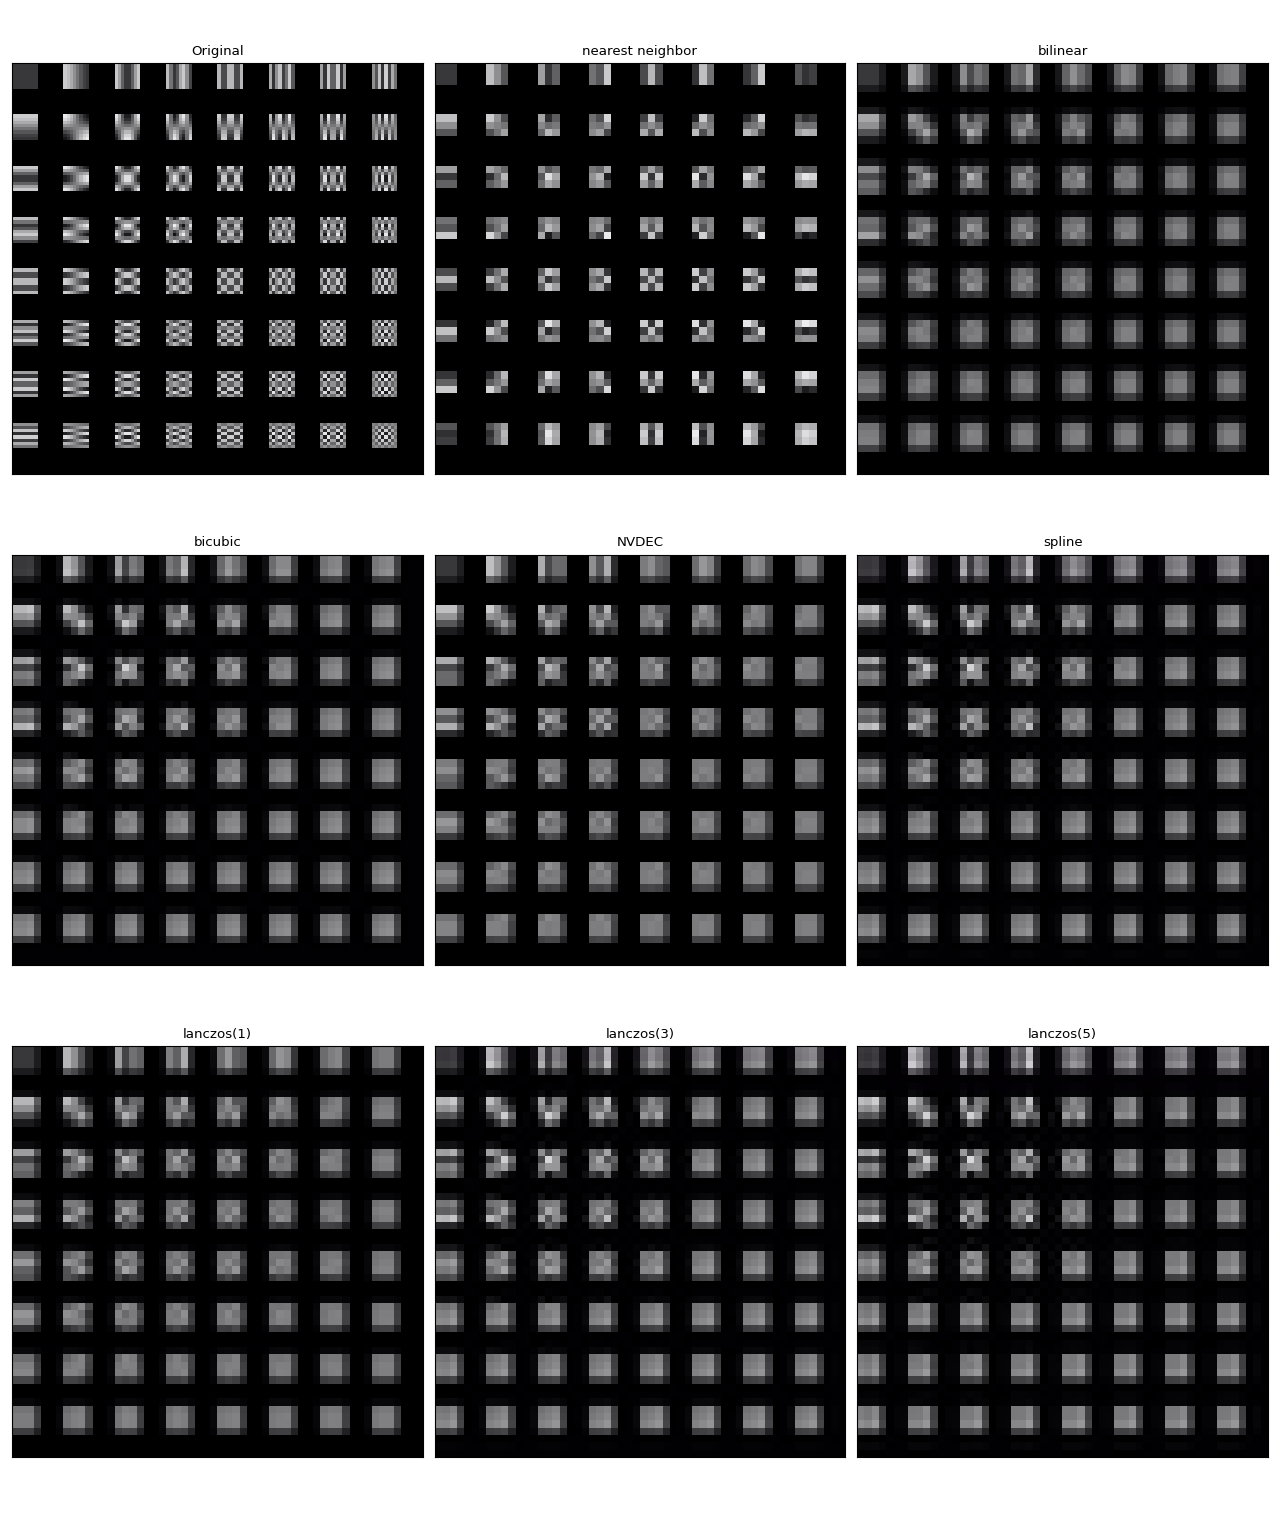
None of them is exactly the same. To the eyes of authors, lanczos(1) appears to be most similar to NVDEC. The bicubic looks close as well.
Benchmark NVDEC with StreamReader
In this section, we compare the performace of software video decoding and HW video decoding.
Decode as CUDA frames
First, we compare the time it takes for software decoder and hardware encoder to decode the same video. To make the result comparable, when using software decoder, we move the resulting tensor to CUDA.
The procedures to test look like the following
Use hardware decoder and place data on CUDA directly
Use software decoder, generate CPU Tensors and move them to CUDA.
The following function implements the hardware decoder test case.
def test_decode_cuda(src, decoder, hw_accel="cuda", frames_per_chunk=5):
    s = StreamReader(src)
    s.add_video_stream(frames_per_chunk, decoder=decoder, hw_accel=hw_accel)

    num_frames = 0
    chunk = None
    t0 = time.monotonic()
    for (chunk,) in s.stream():
        num_frames += chunk.shape[0]
    elapsed = time.monotonic() - t0
    print(f" - Shape: {chunk.shape}")
    fps = num_frames / elapsed
    print(f" - Processed {num_frames} frames in {elapsed:.2f} seconds. ({fps:.2f} fps)")
    return fps
The following function implements the software decoder test case.
def test_decode_cpu(src, threads, decoder=None, frames_per_chunk=5):
    s = StreamReader(src)
    s.add_video_stream(frames_per_chunk, decoder=decoder, decoder_option={"threads": f"{threads}"})

    num_frames = 0
    device = torch.device("cuda")
    t0 = time.monotonic()
    for i, (chunk,) in enumerate(s.stream()):
        if i == 0:
            print(f" - Shape: {chunk.shape}")
        num_frames += chunk.shape[0]
        chunk = chunk.to(device)
    elapsed = time.monotonic() - t0
    fps = num_frames / elapsed
    print(f" - Processed {num_frames} frames in {elapsed:.2f} seconds. ({fps:.2f} fps)")
    return fps
For each resolution of video, we run multiple software decoder test cases with different number of threads.
def run_decode_tests(src, frames_per_chunk=5):
    fps = []
    print(f"Testing: {os.path.basename(src)}")
    for threads in [1, 4, 8, 16]:
        print(f"* Software decoding (num_threads={threads})")
        fps.append(test_decode_cpu(src, threads))
    print("* Hardware decoding")
    fps.append(test_decode_cuda(src, decoder="h264_cuvid"))
    return fps
Now we run the tests with videos of different resolutions.
QVGA
  0%|          | 0.00/1.06M [00:00<?, ?B/s]
100%|##########| 1.06M/1.06M [00:00<00:00, 178MB/s]
Testing: testsrc2_qvga.h264.mp4
* Software decoding (num_threads=1)
 - Shape: torch.Size([5, 3, 240, 320])
 - Processed 900 frames in 0.50 seconds. (1806.62 fps)
* Software decoding (num_threads=4)
 - Shape: torch.Size([5, 3, 240, 320])
 - Processed 900 frames in 0.33 seconds. (2745.66 fps)
* Software decoding (num_threads=8)
 - Shape: torch.Size([5, 3, 240, 320])
 - Processed 900 frames in 0.34 seconds. (2618.36 fps)
* Software decoding (num_threads=16)
 - Shape: torch.Size([5, 3, 240, 320])
 - Processed 895 frames in 0.38 seconds. (2373.79 fps)
* Hardware decoding
 - Shape: torch.Size([5, 3, 240, 320])
 - Processed 900 frames in 1.96 seconds. (459.49 fps)
VGA
  0%|          | 0.00/3.59M [00:00<?, ?B/s]
100%|##########| 3.59M/3.59M [00:00<00:00, 387MB/s]
Testing: testsrc2_vga.h264.mp4
* Software decoding (num_threads=1)
 - Shape: torch.Size([5, 3, 480, 640])
 - Processed 900 frames in 1.21 seconds. (742.50 fps)
* Software decoding (num_threads=4)
 - Shape: torch.Size([5, 3, 480, 640])
 - Processed 900 frames in 0.62 seconds. (1451.09 fps)
* Software decoding (num_threads=8)
 - Shape: torch.Size([5, 3, 480, 640])
 - Processed 900 frames in 0.60 seconds. (1491.94 fps)
* Software decoding (num_threads=16)
 - Shape: torch.Size([5, 3, 480, 640])
 - Processed 895 frames in 0.62 seconds. (1454.80 fps)
* Hardware decoding
 - Shape: torch.Size([5, 3, 480, 640])
 - Processed 900 frames in 0.34 seconds. (2636.78 fps)
XGA
  0%|          | 0.00/9.22M [00:00<?, ?B/s]
100%|##########| 9.22M/9.22M [00:00<00:00, 377MB/s]
Testing: testsrc2_xga.h264.mp4
* Software decoding (num_threads=1)
 - Shape: torch.Size([5, 3, 768, 1024])
 - Processed 900 frames in 2.68 seconds. (336.20 fps)
* Software decoding (num_threads=4)
 - Shape: torch.Size([5, 3, 768, 1024])
 - Processed 900 frames in 1.27 seconds. (710.09 fps)
* Software decoding (num_threads=8)
 - Shape: torch.Size([5, 3, 768, 1024])
 - Processed 900 frames in 1.25 seconds. (718.68 fps)
* Software decoding (num_threads=16)
 - Shape: torch.Size([5, 3, 768, 1024])
 - Processed 895 frames in 1.28 seconds. (696.98 fps)
* Hardware decoding
 - Shape: torch.Size([5, 3, 768, 1024])
 - Processed 900 frames in 0.61 seconds. (1473.75 fps)
Result
Now we plot the result.
def plot():
    fig, ax = plt.subplots(figsize=[9.6, 6.4])

    for items in zip(fps_qvga, fps_vga, fps_xga, "ov^sx"):
        ax.plot(items[:-1], marker=items[-1])
    ax.grid(axis="both")
    ax.set_xticks([0, 1, 2], ["QVGA (320x240)", "VGA (640x480)", "XGA (1024x768)"])
    ax.legend(
        [
            "Software Decoding (threads=1)",
            "Software Decoding (threads=4)",
            "Software Decoding (threads=8)",
            "Software Decoding (threads=16)",
            "Hardware Decoding (CUDA Tensor)",
        ]
    )
    ax.set_title("Speed of processing video frames")
    ax.set_ylabel("Frames per second")
    plt.tight_layout()


plot()
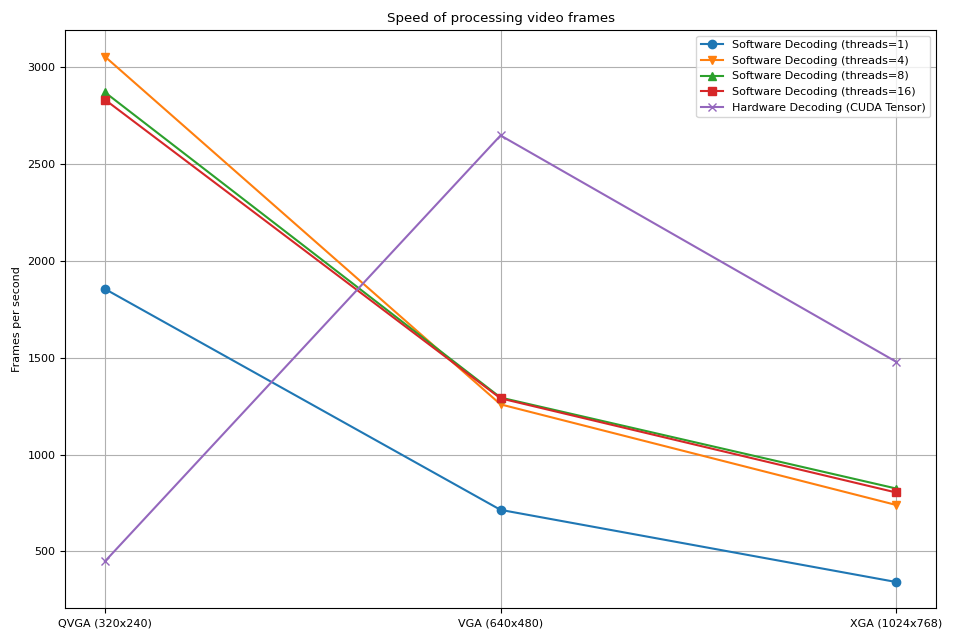
We observe couple of things
Increasing the number of threads in software decoding makes the pipeline faster, but the performance saturates around 8 threads.
The performance gain from using hardware decoder depends on the resolution of video.
At lower resolutions like QVGA, hardware decoding is slower than software decoding
At higher resolutions like XGA, hardware decoding is faster than software decoding.
It is worth noting that the performance gain also depends on the type of GPU. We observed that when decoding VGA videos using V100 or A100 GPUs, hardware decoders are slower than software decoders. But using A10 GPU hardware deocder is faster than software decodr.
Decode and resize
Next, we add resize operation to the pipeline. We will compare the following pipelines.
Decode video using software decoder and read the frames as PyTorch Tensor. Resize the tensor using
torch.nn.functional.interpolate(), then send the resulting tensor to CUDA device.Decode video using software decoder, resize the frame with FFmpeg’s filter graph, read the resized frames as PyTorch tensor, then send it to CUDA device.
Decode and resize video simulaneously with HW decoder, read the resulting frames as CUDA tensor.
The pipeline 1 represents common video loading implementations.
The pipeline 2 uses FFmpeg’s filter graph, which allows to manipulate raw frames before converting them to Tensors.
The pipeline 3 has the minimum amount of data transfer from CPU to CUDA, which significantly contribute to performant data loading.
The following function implements the pipeline 1. It uses PyTorch’s
torch.nn.functional.interpolate().
We use bincubic mode, as we saw that the resulting frames are
closest to NVDEC resizing.
def test_decode_then_resize(src, height, width, mode="bicubic", frames_per_chunk=5):
    s = StreamReader(src)
    s.add_video_stream(frames_per_chunk, decoder_option={"threads": "8"})

    num_frames = 0
    device = torch.device("cuda")
    chunk = None
    t0 = time.monotonic()
    for (chunk,) in s.stream():
        num_frames += chunk.shape[0]
        chunk = torch.nn.functional.interpolate(chunk, [height, width], mode=mode, antialias=True)
        chunk = chunk.to(device)
    elapsed = time.monotonic() - t0
    fps = num_frames / elapsed
    print(f" - Shape: {chunk.shape}")
    print(f" - Processed {num_frames} frames in {elapsed:.2f} seconds. ({fps:.2f} fps)")
    return fps
The following function implements the pipeline 2. Frames are resized as part of decoding process, then sent to CUDA device.
We use bincubic mode, to make the result comparable with
PyTorch-based implementation above.
def test_decode_and_resize(src, height, width, mode="bicubic", frames_per_chunk=5):
    s = StreamReader(src)
    s.add_video_stream(
        frames_per_chunk, filter_desc=f"scale={width}:{height}:sws_flags={mode}", decoder_option={"threads": "8"}
    )

    num_frames = 0
    device = torch.device("cuda")
    chunk = None
    t0 = time.monotonic()
    for (chunk,) in s.stream():
        num_frames += chunk.shape[0]
        chunk = chunk.to(device)
    elapsed = time.monotonic() - t0
    fps = num_frames / elapsed
    print(f" - Shape: {chunk.shape}")
    print(f" - Processed {num_frames} frames in {elapsed:.2f} seconds. ({fps:.2f} fps)")
    return fps
The following function implements the pipeline 3. Resizing is performed by NVDEC and the resulting tensor is placed on CUDA memory.
def test_hw_decode_and_resize(src, decoder, decoder_option, hw_accel="cuda", frames_per_chunk=5):
    s = StreamReader(src)
    s.add_video_stream(5, decoder=decoder, decoder_option=decoder_option, hw_accel=hw_accel)

    num_frames = 0
    chunk = None
    t0 = time.monotonic()
    for (chunk,) in s.stream():
        num_frames += chunk.shape[0]
    elapsed = time.monotonic() - t0
    fps = num_frames / elapsed
    print(f" - Shape: {chunk.shape}")
    print(f" - Processed {num_frames} frames in {elapsed:.2f} seconds. ({fps:.2f} fps)")
    return fps
The following function run the benchmark functions on given sources.
def run_resize_tests(src):
    print(f"Testing: {os.path.basename(src)}")
    height, width = 224, 224
    print("* Software decoding with PyTorch interpolate")
    cpu_resize1 = test_decode_then_resize(src, height=height, width=width)
    print("* Software decoding with FFmpeg scale")
    cpu_resize2 = test_decode_and_resize(src, height=height, width=width)
    print("* Hardware decoding with resize")
    cuda_resize = test_hw_decode_and_resize(src, decoder="h264_cuvid", decoder_option={"resize": f"{width}x{height}"})
    return [cpu_resize1, cpu_resize2, cuda_resize]
Now we run the tests.
QVGA
Testing: testsrc2_qvga.h264.mp4
* Software decoding with PyTorch interpolate
 - Shape: torch.Size([5, 3, 224, 224])
 - Processed 900 frames in 0.68 seconds. (1331.12 fps)
* Software decoding with FFmpeg scale
 - Shape: torch.Size([5, 3, 224, 224])
 - Processed 900 frames in 0.39 seconds. (2337.60 fps)
* Hardware decoding with resize
 - Shape: torch.Size([5, 3, 224, 224])
 - Processed 900 frames in 2.02 seconds. (446.63 fps)
VGA
Testing: testsrc2_vga.h264.mp4
* Software decoding with PyTorch interpolate
 - Shape: torch.Size([5, 3, 224, 224])
 - Processed 900 frames in 1.47 seconds. (611.65 fps)
* Software decoding with FFmpeg scale
 - Shape: torch.Size([5, 3, 224, 224])
 - Processed 900 frames in 0.68 seconds. (1328.66 fps)
* Hardware decoding with resize
 - Shape: torch.Size([5, 3, 224, 224])
 - Processed 900 frames in 0.34 seconds. (2654.48 fps)
XGA
Testing: testsrc2_xga.h264.mp4
* Software decoding with PyTorch interpolate
 - Shape: torch.Size([5, 3, 224, 224])
 - Processed 900 frames in 3.07 seconds. (293.05 fps)
* Software decoding with FFmpeg scale
 - Shape: torch.Size([5, 3, 224, 224])
 - Processed 900 frames in 1.02 seconds. (884.01 fps)
* Hardware decoding with resize
 - Shape: torch.Size([5, 3, 224, 224])
 - Processed 900 frames in 0.61 seconds. (1481.19 fps)
Result
Now we plot the result.
def plot():
    fig, ax = plt.subplots(figsize=[9.6, 6.4])

    for items in zip(fps_qvga, fps_vga, fps_xga, "ov^sx"):
        ax.plot(items[:-1], marker=items[-1])
    ax.grid(axis="both")
    ax.set_xticks([0, 1, 2], ["QVGA (320x240)", "VGA (640x480)", "XGA (1024x768)"])
    ax.legend(
        [
            "Software decoding\nwith resize\n(PyTorch interpolate)",
            "Software decoding\nwith resize\n(FFmpeg scale)",
            "NVDEC\nwith resizing",
        ]
    )
    ax.set_title("Speed of processing video frames")
    ax.set_xlabel("Input video resolution")
    ax.set_ylabel("Frames per second")
    plt.tight_layout()


plot()
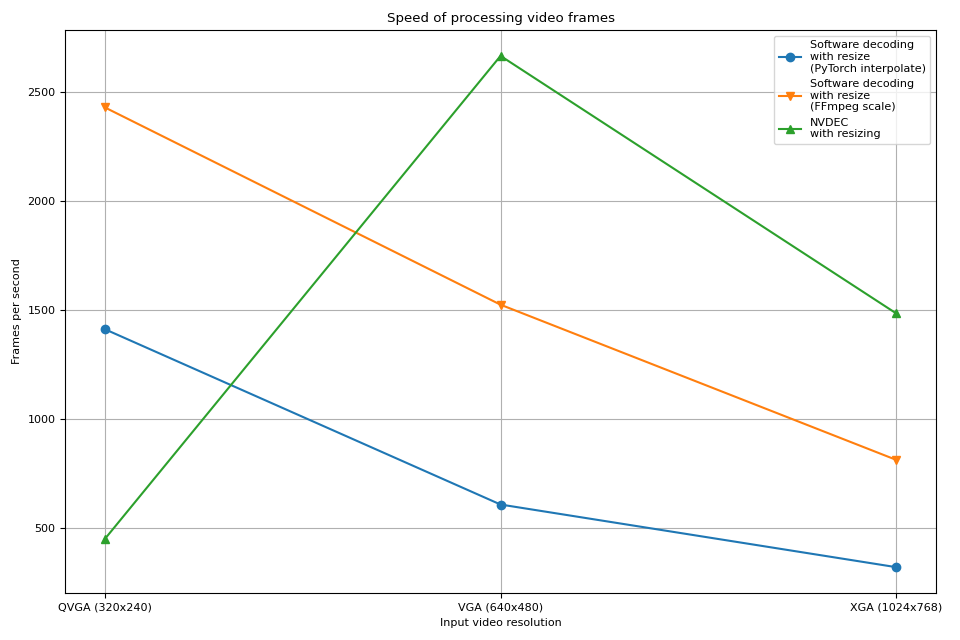
Hardware deocder shows a similar trend as previous experiment. In fact, the performance is almost the same. Hardware resizing has almost zero overhead for scaling down the frames.
Software decoding also shows a similar trend. Performing resizing as part of decoding is faster. One possible explanation is that, video frames are internally stored as YUV420P, which has half the number of pixels compared to RGB24, or YUV444P. This means that if resizing before copying frame data to PyTorch tensor, the number of pixels manipulated and copied are smaller than the case where applying resizing after frames are converted to Tensor.
Tag: torchaudio.io
Total running time of the script: ( 0 minutes 30.868 seconds)


