Fine-Tuning Llama3 with QAT
Quantization-Aware Training (QAT) is a common technique for users to quantize their models without incurring significant degradations in accuracy or perplexity. In this tutorial, we’ll walk through how to apply QAT during fine-tuning, quantize the resulting model, and evaluate your quantized model using torchtune.
What QAT is and how it helps reduce quantization degradation
How to run QAT during fine-tuning in torchtune
End-to-end example of connecting QAT, quantization, and evaluation recipes
Be familiar with torchtune
Make sure to install torchtune
Make sure you have downloaded the Llama3-8B model weights
What is QAT?
Quantization-Aware Training (QAT) refers to simulating quantization numerics during training or fine-tuning, with the end goal of ultimately producing a higher quality quantized model compared to simple post-training quantization (PTQ). During QAT, the weights and/or activations are “fake quantized”, meaning they are transformed as if they were being quantized, but kept in the original data type (e.g. bfloat16) without being actually cast to lower bit-widths. Thus, fake quantization allows the model to adjust for quantization noise when updating the weights, hence the training process is “aware” that the model will ultimately be quantized after training.
# PTQ: x_q is quantized and cast to int8
# scale and zero point (zp) refer to parameters used to quantize x_float
# qmin and qmax refer to the range of quantized values
x_q = (x_float / scale + zp).round().clamp(qmin, qmax).cast(int8)

# QAT: x_fq is still in float
# Fake quantize simulates the numerics of quantize + dequantize
x_fq = (x_float / scale + zp).round().clamp(qmin, qmax)
x_fq = (x_fq - zp) * scale
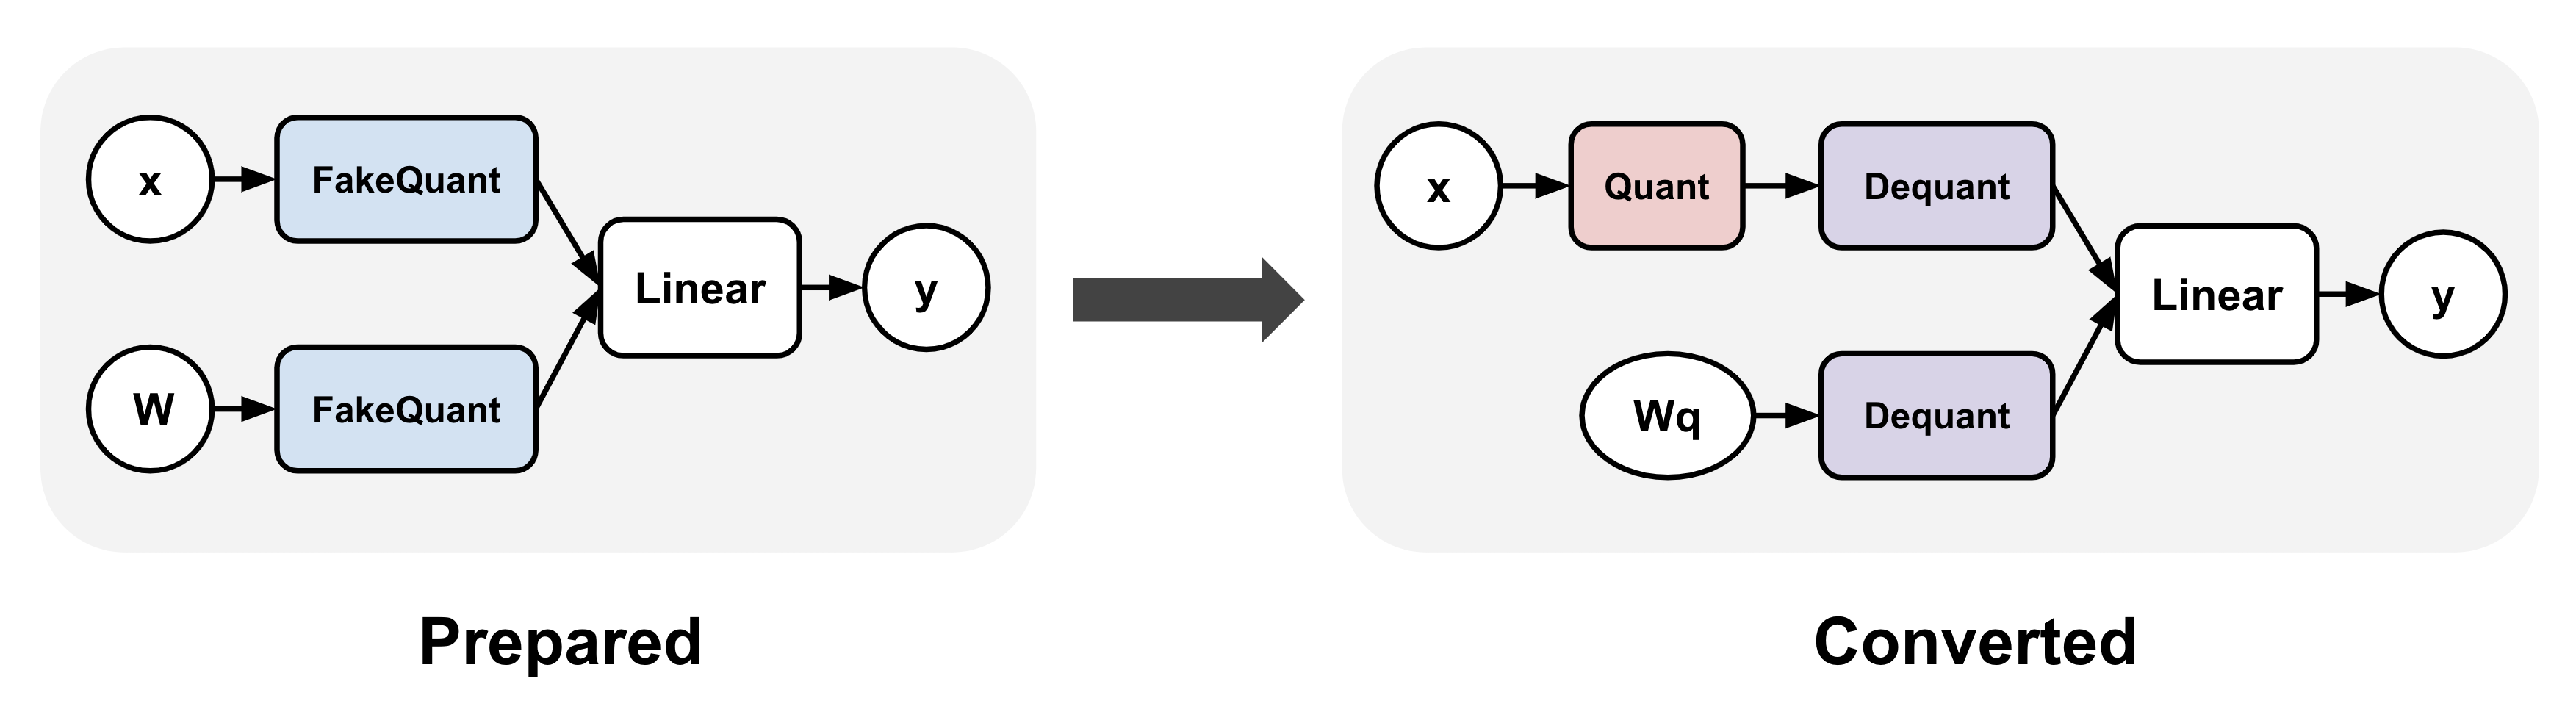
QAT typically involves applying a transformation to your model before and after training.
For example, in the torchao QAT implementation,
these are represented as the prepare() and convert() steps: (1) prepare() inserts fake quantize
operations into linear layers, and (2) convert() transforms the fake quantize operations
to actual quantize and dequantize operations after training, thereby producing a quantized
model (dequantize operations are typically fused with linear after lowering).
Between these two steps, training can proceed exactly as before.
Applying QAT to Llama3 models
We can easily apply the above QAT transformations to Llama3 in torchtune for fine-tuning:
from torchtune.training.quantization import Int8DynActInt4WeightQATQuantizer
from torchtune.models.llama3 import llama3_8b

model = llama3_8b()

# Quantizer for int8 dynamic per token activations +
# int4 grouped per channel weights, only for linear layers
quantizer = Int8DynActInt4WeightQATQuantizer()

# Insert "fake quantize" operations into linear layers.
# These operations simulate quantization numerics during
# fine-tuning without performing any dtype casting
prepared_model = quantizer.prepare(model)
If we print the model we’ll see that all linear layers have been swapped with
Int8DynActInt4WeightQATLinear, which simulates the numerics of int8
dynamic per token activations + int4 grouped per channel weights. Now the model
is ready for fine-tuning.
>>> print(model.layers[0].attn)
MultiHeadAttention(
  (q_proj): Linear(in_features=4096, out_features=4096, bias=False)
  (k_proj): Linear(in_features=4096, out_features=1024, bias=False)
  (v_proj): Linear(in_features=4096, out_features=1024, bias=False)
  (output_proj): Linear(in_features=4096, out_features=4096, bias=False)
  (pos_embeddings): RotaryPositionalEmbeddings()
)

>>> print(prepared_model.layers[0].attn)
MultiHeadAttention(
  (q_proj): Int8DynActInt4WeightQATLinear(in_features=4096, out_features=4096, bias=False)
  (k_proj): Int8DynActInt4WeightQATLinear(in_features=4096, out_features=1024, bias=False)
  (v_proj): Int8DynActInt4WeightQATLinear(in_features=4096, out_features=1024, bias=False)
  (output_proj): Int8DynActInt4WeightQATLinear(in_features=4096, out_features=4096, bias=False)
  (pos_embeddings): RotaryPositionalEmbeddings()
)
After fine-tuning, we can convert the model to get an actual quantized model. If we print the converted model, we’ll see that the QAT linears have been swapped with Int8DynActInt4WeightLinear, which are the quantized versions of the linear layers. This quantized model can then be saved to checkpoint and used for inference or generation.
# Fine-tune as before
train_loop(prepared_model)

# Convert fake quantize to actual quantize operations
converted_model = quantizer.convert(prepared_model)
>>> print(converted_model.layers[0].attn)
MultiHeadAttention(
  (q_proj): Int8DynActInt4WeightLinear()
  (k_proj): Int8DynActInt4WeightLinear()
  (v_proj): Int8DynActInt4WeightLinear()
  (output_proj): Int8DynActInt4WeightLinear()
  (pos_embeddings): RotaryPositionalEmbeddings()
)
QAT finetuning recipe in torchtune
Putting it all together, we can now fine-tune a model using torchtune’s QAT recipe. Make sure that you have first downloaded the Llama3 weights and tokenizer by following these instructions. In this tutorial, we use the following settings to demonstrate QAT’s effectiveness in recovering quantization degradation compared to directly quantizing a model fine-tuned without QAT. You can copy the default QAT config and make the following modifications accordingly:
tune cp llama3/8B_qat_full custom_8B_qat_full.yaml
# Dataset
dataset:
  _component_: torchtune.datasets.text_completion_dataset
  source: allenai/c4
  max_seq_len: 8192
  column: text
  name: en
  split: train
seed: null
shuffle: True

...

epochs: 1
max_steps_per_epoch: 2000
fake_quant_after_n_steps: 1000
memory_efficient_fsdp_wrap: False
Empirically, we observed that disabling fake quantization for the first N steps led to better results, presumably because doing so allows the weights to stabilize before we start introducing quantization noise to the fine-tuning process. For this reason, here we disable fake quantization for the first 1000 steps.
You can then use the following command to run fine-tuning with QAT using the above config. This workload requires at least 6 GPUs, each with VRAM of at least 80GB. By default, this uses the int8 dynamic per token activations + int4 grouped per channel weights quantization configuration as shown above:
tune run --nnodes 1 --nproc_per_node 6 qat_distributed --config custom_8B_qat_full.yaml
Note
Make sure to point to the location of your Llama3 weights and tokenizer. This can be done
either by adding checkpointer.checkpoint_files=[my_model_checkpoint_path] tokenizer_checkpoint=my_tokenizer_checkpoint_path
or by directly modifying the 8B_qat_full.yaml file. See our All About Configs
for more details on how you can easily clone and modify torchtune configs.
Note
QAT introduces memory and computation overheads compared to regular fine-tuning, since fake quantization fundamentally involves extra ops and requires cloning the weights to avoid mutating them when computing the fake quantized values. In general, we expect around 30% decrease in fine-tuning speed for models like Llama3-8B. With activation checkpointing, the increase in memory footprint per GPU is minimal (< 5GB per GPU).
Quantizing the QAT model
Note that the QAT recipe above produces an unquantized bfloat16 model. The model structure is exactly the same as the model produced with regular full fine-tuning without QAT, just with different weights. To actually get a quantized model, copy and make the following modifications to the quantization config:
tune cp quantization custom_quantization.yaml
# Model arguments
model:
  _component_: torchtune.models.llama3.llama3_8b

checkpointer:
  _component_: torchtune.training.FullModelMetaCheckpointer
  checkpoint_dir: <your QAT checkpoint dir>
  checkpoint_files: [meta_model_0.pt]
  recipe_checkpoint: null
  output_dir: <your QAT checkpoint dir>
  model_type: LLAMA3

...

quantizer:
  _component_: torchtune.training.quantization.Int8DynActInt4WeightQATQuantizer
  groupsize: 256
The following command performs the convert step in the QAT flow, which actually quantizes the float model to a model with quantized weights:
tune run quantize --config custom_quantization.yaml
Note
Make sure to use the same QAT quantizer you used to fine-tune your model, otherwise the numerics will be off and the quantized model will perform poorly.
Evaluating the quantized model
Now that we have a quantized model, we can run some evaluations on it and compare the results against regular fine-tuning without QAT (i.e. post-training quantization). To achieve this, we use EleutherAI’s evaluation harness integrated in torchtune. First, copy the evaluation config and make the following changes:
tune cp eleuther_evaluation custom_eleuther_evaluation.yaml
# Model arguments
model:
  _component_: torchtune.models.llama3.llama3_8b

checkpointer:
  _component_: torchtune.training.FullModelTorchTuneCheckpointer
  checkpoint_dir: <your quantized model checkpoint dir>
  checkpoint_files: [meta_model_0-8da4w.pt]
  recipe_checkpoint: null
  output_dir: <your quantized model checkpoint dir>
  model_type: LLAMA3

...

# EleutherAI specific eval args
tasks: ["hellaswag", "wikitext"]
limit: null
max_seq_length: 8192
batch_size: 8

quantizer:
  _component_: torchtune.training.quantization.Int8DynActInt4WeightQuantizer
  groupsize: 256
Note
Since we are passing in a quantized model, be sure to use the corresponding
post-training quantizer instead of the QAT quantizer. For example, if you
used the Int8DynActInt4WeightQATQuantizer during fine-tuning, you
should specify Int8DynActInt4WeightQuantizer in this step. See the
quantization recipe
for a full list of supported quantizers.
Now run the evaluation recipe:
tune run eleuther_eval --config my_eleuther_evaluation.yaml
The results should look something like this:
# QAT quantized model evaluation results (int8 activations + int4 weights)

|  Tasks  |Version|Filter|n-shot|    Metric     |Value |   |Stderr|
|---------|------:|------|-----:|---------------|-----:|---|------|
|wikitext |      2|none  |     0|word_perplexity|9.9148|±  |N/A   |
|         |       |none  |     0|byte_perplexity|1.5357|±  |N/A   |
|         |       |none  |     0|bits_per_byte  |0.6189|±  |N/A   |
|hellaswag|      1|none  |     0|acc            |0.5687|±  |0.0049|
|         |       |none  |     0|acc_norm       |0.7536|±  |0.0043|
Comparing these results to the model fine-tuned without QAT, we can see that QAT was able to recover a significant portion of the quantization degradations from the original unquantized model compared to PTQ. For example, normalized accuracy in the hellaswag task dropped by 2.20% with PTQ but only 0.74% with QAT when compared to the original unquantized model. Similarly, word perplexity in the wikitext task increased by 2.048 with PTQ but only 1.190 with QAT (lower is better).
# PTQ quantized model evaluation results (int8 activations + int4 weights)

|  Tasks  |Version|Filter|n-shot|    Metric     | Value |   |Stderr|
|---------|------:|------|-----:|---------------|------:|---|------|
|wikitext |      2|none  |     0|word_perplexity|10.7735|±  |N/A   |
|         |       |none  |     0|byte_perplexity| 1.5598|±  |N/A   |
|         |       |none  |     0|bits_per_byte  | 0.6413|±  |N/A   |
|hellaswag|      1|none  |     0|acc            | 0.5481|±  |0.0050|
|         |       |none  |     0|acc_norm       | 0.7390|±  |0.0044|
# Float model evaluation results (bfloat16)

|  Tasks  |Version|Filter|n-shot|    Metric     |Value |   |Stderr|
|---------|------:|------|-----:|---------------|-----:|---|------|
|wikitext |      2|none  |     0|word_perplexity|8.7251|±  |N/A   |
|         |       |none  |     0|byte_perplexity|1.4994|±  |N/A   |
|         |       |none  |     0|bits_per_byte  |0.5844|±  |N/A   |
|hellaswag|      1|none  |     0|acc            |0.5740|±  |0.0049|
|         |       |none  |     0|acc_norm       |0.7610|±  |0.0043|
Thus, the QAT flow produced a quantized model that outperforms the post-training quantized model. Importantly, the quantized model structure is identical in both flows, and so the model size, memory usage, and all other performance characteristics are also the same.
Note that although the weights are quantized to int4, the quantized model size for both the QAT and the PTQ flows are 8.187 GB, while the original float model is 14.958 GB. This is because this quantizer uses int8 to represent the weights as PyTorch does not have native int4 dtype support. A more efficient representation is to pack the int4 weights, which will halve the quantized model size. This is what the Int4WeightOnlyQuantizer does, and the corresponding QAT quantizer will be added in the future.
Lowering QAT model to device (optional)
One important motivation for quantizing a model is to be able to run it in resource constrained environments. You can further lower your QAT Llama3 model to edge devices such as smartphones using executorch by following these instructions. For example, the following command lowers the model to the XNNPACK backend:
python -m examples.models.llama2.export_llama --checkpoint <your QAT checkpoint> -p <params.json> -kv --use_sdpa_with_kv_cache -X -qmode 8da4w --group_size 256 -d fp32 --metadata '{"get_bos_id":128000, "get_eos_id":128001}' --embedding-quantize 4,32 --output_name="llama3_8da4w.pte"
This results in a much smaller quantized model of size 3.881 GB. When benchmarked on a OnePlus 12 smartphone, this model also achieved the same inference and generation speeds as the post-training quantized model. This is because the model structures are the same across the two flows:
QAT |
PTQ |
|
|---|---|---|
Quantized model size |
3.881 GB |
3.881 GB |
Inference speed |
9.709 tok/s |
9.815 tok/s |
Generation speed |
11.316 tok/s |
11.364 tok/s |
