Using Intel® Extension for PyTorch to Boost Image Processing Performance
PyTorch delivers great CPU performance, and it can be further accelerated with Intel® Extension for PyTorch. I trained an AI image segmentation model using PyTorch 1.13.1 (with ResNet34 + UNet architecture) to identify roads and speed limits from satellite images, all on the 4th Gen Intel® Xeon® Scalable processor.
I will walk you through the steps to work with a satellite image dataset called SpaceNet5 and how I optimized the code to make deep learning workloads feasible on CPUs just by flipping a few key switches.
Before we get started, some housekeeping…
The code accompanying this article is available in the examples folder in the Intel Extension for PyTorch repository. I borrowed heavily from the City-Scale Road Extraction from Satellite Imagery (CRESI) repository. I adapted it for the 4th Gen Intel Xeon processors with PyTorch optimizations and Intel Extension for PyTorch optimizations. In particular, I was able to piece together a workflow using the notebooks here.
You can find the accompanying talk I gave on YouTube.
I also highly recommend these articles for a detailed explanation of how to get started with the SpaceNet5 data:
- The SpaceNet 5 Baseline — Part 1: Imagery and Label Preparation
- The SpaceNet 5 Baseline — Part 2: Training a Road Speed Segmentation Model
- The SpaceNet 5 Baseline — Part 3: Extracting Road Speed Vectors from Satellite Imagery
- SpaceNet 5 Winning Model Release: End of the Road
I referenced two Hugging Face blogs by Julien Simon; he ran his tests on the AWS instance r7iz.metal-16xl:
- Accelerating PyTorch Transformers with Intel Sapphire Rapids, part 1
- Accelerating PyTorch Transformers with Intel Sapphire Rapids, part 2
The potential cost savings from using a CPU instance instead of a GPU instance on the major cloud service providers (CSP) can be significant. The latest processors are still being rolled out to the CSPs, so I’m using a 4th Gen Intel Xeon processor that is hosted on the Intel® Developer Cloud (you can sign up for the Beta here: cloud.intel.com).
On AWS, you can select from the r7iz.* EC2 instances after you sign up for the preview here (Figure 1). At the time of writing, the new AI-acceleration engine, Intel® Advanced Matrix Extensions (Intel® AMX), is only available on bare metal but it should soon be enabled on the virtual machines.
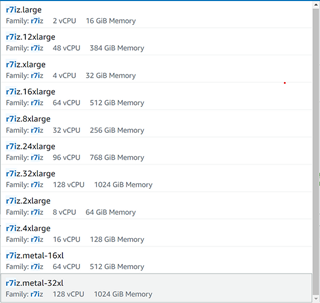
Figure 1. List of 4th Gen Xeon instances on AWS EC2 (image by author)
On Google Cloud* Platform, you can select from the 4th Gen Xeon Scalable processors C3 VMs (Figure 2).
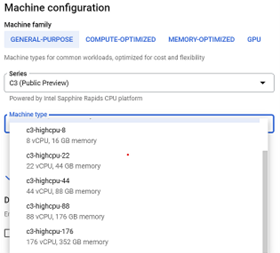
Figure 2. List of 4th Gen Intel Xeon Scalable processor instances on Google Cloud Platform (image by author)
Hardware Introduction and Optimizations
The 4th Gen Intel Xeon processors were released January 2023, and the bare-metal instance I am using has two sockets (each with 56 physical cores), 504 GB of memory, and Intel AMX acceleration. I installed a few key libraries in the backend to take control and monitor the sockets, memory, and cores that I am using on the CPU:
numactl (with sudo apt-get install numactl)
libjemalloc-dev (with sudo apt-get install libjemalloc)
intel-openmp (with conda install intel-openmp)
gperftools (with conda install gperftools -c conda-forge)
Both PyTorch and Intel Extension for PyTorch have helper scripts so that one does not need to explicitly use intel-openmp and numactl, but they do need to be installed in the backend. In case you want to set them up for other work, here is what I used for OpenMP* …
export OMP_NUM_THREADS=36
export KMP_AFFINITY=granularity=fine,compact,1,0
export KMP_BLOCKTIME=1
… where OMP_NUM_THREADS is the number of threads allocated to the job, KMP_AFFINITY affects thread affinity settings (including packing threads close to each other, the state of pinning threads), and KMP_BLOCKTIME sets the time in milliseconds that an idle thread should wait before going to sleep.
Here’s what I used for numactl …
numactl -C 0-35 --membind=0 train.py
…where -C specifies which cores to use and --membind instructs the program to only use one socket (socket 0 in this case).
SpaceNet Data
I am using a satellite image dataset from the SpaceNet 5 Challenge. Different cities can be downloaded for free from an AWS S3 bucket:
aws s3 ls s3://spacenet-dataset/spacenet/SN5_roads/tarballs/ --human-readable
2019-09-03 20:59:32    5.8 GiB SN5_roads_test_public_AOI_7_Moscow.tar.gz
2019-09-24 08:43:02    3.2 GiB SN5_roads_test_public_AOI_8_Mumbai.tar.gz
2019-09-24 08:43:47    4.9 GiB SN5_roads_test_public_AOI_9_San_Juan.tar.gz
2019-09-14 13:13:26   35.0 GiB SN5_roads_train_AOI_7_Moscow.tar.gz
2019-09-14 13:13:34   18.5 GiB SN5_roads_train_AOI_8_Mumbai.tar.gz
You can use the following commands to download and unpack a file:
aws s3 cp s3://spacenet-dataset/spacenet/SN5_roads/tarballs/SN5_roads_train_AOI_7_Moscow.tar.gz .
tar -xvzf ~/spacenet5data/moscow/SN5_roads_train_AOI_7_Moscow.tar.gz
Dataset Preparation
I used the Moscow satellite image dataset, which consists of 1,352 images of 1,300 by 1,300 pixels with corresponding street labels in separate text files. The dataset contains both 8-band multispectral images and 3-band RGB images. Figure 3 shows four sample RGB satellite images and their corresponding generated masks. I used the speed_masks.py script from the CRESI repository to generate the segmentation masks.
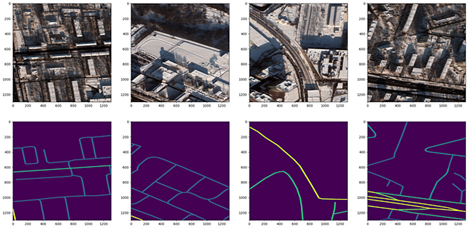
Figure 3. Satellite image 3-channel RGB chips from Moscow (top row) and corresponding pixel segmentation masks with varying speed limits (bottom row) (image by author)
There is a JSON configuration file that must be updated for all remaining components: training and validation split, training, and inference. An example configuration can be found here. I perform an 80:20 training/validation split, making sure to point to the correct folder of satellite images and corresponding masks for training. The configuration parameters are explained in more in the notebook under examples in GitHub for Intel Extension for PyTorch here.
Training a ResNet34 + UNet Model
I made some changes to the cresi code described below in order to run on a CPU and optimize the training. To run natively on a CPU, replace self.model = nn.DataParallel(model).cuda() with self.model = nn.DataParallel(model) in the train.py script. In the 01_train.py script, remove torch.randn(10).cuda().
To optimize training, add import intel_extension_for_pytorch as ipex to the import statements in the train.py script. Just after defining the model and optimizer as follows:
self.model = nn.DataParallel(model)
self.optimizer = optimizer(self.model.parameters(), lr=config.lr)
Add the ipex.optimize line to use BF16 precision, instead of FP32: \
self.model, self.optimizer = ipex.optimize(self.model,
    optimizer=self.optimizer,dtype=torch.bfloat16)
Add a line to do mixed-precision training just before running a forward pass and calculating the loss function:
with torch.cpu.amp.autocast():
    if verbose:
        print("input.shape, target.shape:", input.shape, target.shape)
    output = self.model(input)
    meter = self.calculate_loss_single_channel(output, target, meter, training, iter_size)
Now that we have optimized our training code, we can move onto training our model.
Like the winner of the SpaceNet 5 competition, I trained a ResNet34 encoder + UNet decoder model. It is pretrained from ImageNet weights, and the backbone is left completely unfrozen during training. The training can be run with the 01_train.py script, but in order to control the use of hardware I used a helper script. There are actually two helper scripts: one that comes with stock PyTorch and one that comes with Intel Extension for PyTorch. They both accomplish the same thing, but the first one from stock is torch.backends.xeon.run_cpu, and the second one from Intel Extension for PyTorch is ipexrun.
Here is what I ran in the command-line:
python -m torch.backends.xeon.run_cpu --ninstances 1 \
  --ncores_per_instance 32 \
  --log_path /home/devcloud/spacenet5data/moscow/v10_xeon4_devcloud22.04/logs/run_cpu_logs \
  /home/devcloud/cresi/cresi/01_train.py \
  /home/devcloud/cresi/cresi/configs/ben/v10_xeon4_baseline_ben.json --fold=0
ipexrun --ninstances 1 \
--ncore_per_instance 32 \
/home/devcloud/cresi/cresi/01_train.py \
/home/devcloud/cresi/cresi/configs/ben/v10_xeon4_baseline_ben.json --fold=0
In both cases, I am asking PyTorch to run training on one socket with 32 cores. Upon running, I get a printout of what environment variables get set in the backend to understand how PyTorch is using the hardware:
INFO - Use TCMalloc memory allocator
INFO - OMP_NUM_THREADS=32
INFO - Using Intel OpenMP
INFO - KMP_AFFINITY=granularity=fine,compact,1,0
INFO - KMP_BLOCKTIME=1
INFO - LD_PRELOAD=/home/devcloud/.conda/envs/py39/lib/libiomp5.so:/home/devcloud/.conda/envs/py39/lib/libtcmalloc.so
INFO - numactl -C 0-31 -m 0 /home/devcloud/.conda/envs/py39/bin/python -u 01_train.py configs/ben/v10_xeon4_baseline_ben.json --fold=0
During training, I make sure that my total loss function is decreasing (i.e., the model is converging on a solution).
Inference
After training a model, we can start to make predictions from satellite images alone. In the eval.py inference script, add import intel_extension_for_pytorch as ipex to the import statements. After loading the PyTorch model, use Intel Extension for PyTorch to optimize the model for BF16 inference:
model = torch.load(os.path.join(path_model_weights,
    'fold{}_best.pth'.format(fold)),
    map_location = lambda storage,
    loc: storage)
model.eval()
model = ipex.optimize(model, dtype = torch.bfloat16)
Just prior to running prediction, add two lines for mixed precision:
with torch.no_grad():
    with torch.cpu.amp.autocast():
        for data in pbar:
            samples = torch.autograd.Variable(data['image'], volatile=True)
            predicted = predict(model, samples, flips=self.flips)
To run inference, we can use the 02_eval.py script. Now that we have a trained model, we can make predictions on satellite images (Figure 4). We can see that it does seem to map the roads closely to the image!
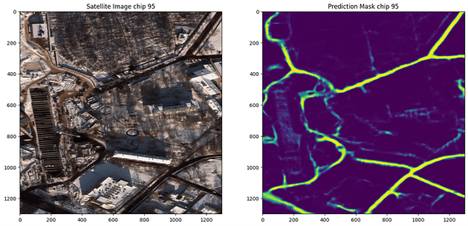
Figure 4. Moscow satellite image and accompanying prediction of roads (image by author)
I realize that the model I’ve trained is overfit to the Moscow image data and probably won’t generalize well to other cities. However, the winning solution to this challenge used data from six cities (Las Vegas, Paris, Shanghai, Khartoum, Moscow, Mumbai) and performs well on new cities. In the future, one thing that would be worth testing is training on all six cities and running inference on another city to reproduce their results.
Note on Post-Processing
There are further post-processing steps that can be performed to add the mask as graph features to maps. You can read more about the post-processing steps here:
The SpaceNet 5 Baseline — Part 3: Extracting Road Speed Vectors from Satellite Imagery
Conclusions
In summary, we:
- Created 1,352 image training masks (with speed limits) to correspond to our training satellite image data (from .geojson text file labels)
- Defined our configuration file for training and inference
- Split up our data into training and validation sets
- Optimized our code for CPU training, including using Intel Extension for PyTorch and BF16
- Trained a performant ResNet34 + UNet model on a 4th Gen Intel Xeon CPU
- Ran initial inference to see the prediction of a speed limit mask
You can find detailed benchmarks here for the 4th Gen Intel Xeon CPU here.
Next Steps
Extend the optimizations on an Intel CPU by using the Intel Extension for PyTorch:
pip install intel-extension-for-pytorch
git clone https://github.com/intel/intel-extension-for-pytorch
Get in touch with me on LinkedIn if you have any more questions!
More information about the Intel Extension for PyTorch can be found here.
Get the Software
I encourage you to check out Intel’s other AI Tools and Framework optimizations and learn about the open, standards-based oneAPI multiarchitecture, multivendor programming model that forms the foundation of Intel’s AI software portfolio.
For more details about 4th Gen Intel Xeon Scalable processor, visit AI Platform where you can learn about how Intel is empowering developers to run high-performance, efficient end-to-end AI pipelines.