Note
Click here to download the full example code
StreamWriter Basic Usage
Author: Moto Hira
This tutorial shows how to use torchaudio.io.StreamWriter to
encode and save audio/video data into various formats/destinations.
Note
This tutorial requires torchaudio nightly build and FFmpeg libraries (>=4.1, <4.4).
To install torchaudio nightly build, please refer to https://pytorch.org/get-started/locally/ .
There are multiple ways to install FFmpeg libraries.
If you are using Anaconda Python distribution,
conda install 'ffmpeg<4.4' will install the required FFmpeg libraries.
Warning
TorchAudio dynamically loads compatible FFmpeg libraries installed on the system. The types of supported formats (media format, encoder, encoder options, etc) depend on the libraries.
To check the available muxers and encoders, you can use the following command
ffmpeg -muxers
ffmpeg -encoders
Preparation
import torch
import torchaudio

print(torch.__version__)
print(torchaudio.__version__)
1.13.1
0.13.1
try:
    from torchaudio.io import StreamWriter
except ImportError:
    try:
        import google.colab

        print(
            """
            To enable running this notebook in Google Colab, install nightly
            torch and torchaudio builds by adding the following code block to the top
            of the notebook before running it:
            !pip3 uninstall -y torch torchvision torchaudio
            !pip3 install --pre torch torchvision torchaudio --extra-index-url https://download.pytorch.org/whl/nightly/cpu
            """
        )
    except ModuleNotFoundError:
        pass
    raise

print("FFmpeg library versions")
for k, v in torchaudio.utils.ffmpeg_utils.get_versions().items():
    print(f"  {k}: {v}")
FFmpeg library versions
  libavutil: (56, 31, 100)
  libavcodec: (58, 54, 100)
  libavformat: (58, 29, 100)
  libavfilter: (7, 57, 100)
  libavdevice: (58, 8, 100)
import io
import os
import tempfile

from torchaudio.utils import download_asset
from IPython.display import Audio, Video

SAMPLE_PATH = download_asset("tutorial-assets/Lab41-SRI-VOiCES-src-sp0307-ch127535-sg0042.wav")
WAVEFORM, SAMPLE_RATE = torchaudio.load(SAMPLE_PATH, channels_first=False)
NUM_FRAMES, NUM_CHANNELS = WAVEFORM.shape

_BASE_DIR = tempfile.TemporaryDirectory()


def get_path(filename):
    return os.path.join(_BASE_DIR.name, filename)
The basic usage
To save Tensor data into media formats with StreamWriter, there are three necessary steps
Specify the output
Configure streams
Write data
The following code illustrates how to save audio data as WAV file.
# 2. Configure the stream. (8kHz, Stereo WAV)
s.add_audio_stream(
    sample_rate=SAMPLE_RATE,
    num_channels=NUM_CHANNELS,
)
# 3. Write the data
with s.open():
    s.write_audio_chunk(0, WAVEFORM)
Audio(path)
Now we look into each step in more detail.
Write destination
StreamWriter supports different types of write destinations
Local files
File-like objects
Streaming protocols (such as RTMP and UDP)
Media devices (speakers and video players) †
† For media devices, please refer to StreamWriter Advanced Usages.
Local files
StreamWriter supports saving media to local files.
StreamWriter(dst="audio.wav")

StreamWriter(dst="audio.mp3")
This works for still images and videos as well.
StreamWriter(dst="image.jpeg")

StreamWriter(dst="video.mpeg")
File-like objects
You can also pass a file-lie object. A file-like object must implement
write method conforming to io.RawIOBase.write.
# Open the local file as fileobj
with open("audio.wav", "wb") as dst:
    StreamWriter(dst=dst)
# In-memory encoding
buffer = io.BytesIO()
StreamWriter(dst=buffer)
Streaming protocols
You can stream the media with streaming protocols
# Real-Time Messaging Protocol
StreamWriter(dst="rtmp://localhost:1234/live/app", format="flv")

# UDP
StreamWriter(dst="udp://localhost:48550", format="mpegts")
Configuring output streams
Once the destination is specified, the next step is to configure the streams. For typical audio and still image cases, only one stream is required, but for video with audio, at least two streams (one for audio and the other for video) need to be configured.
Audio Stream
An audio stream can be added with
add_audio_stream() method.
For writing regular audio files, at minimum sample_rate and num_channels
are required.
s = StreamWriter("audio.wav")
s.add_audio_stream(sample_rate=8000, num_channels=2)
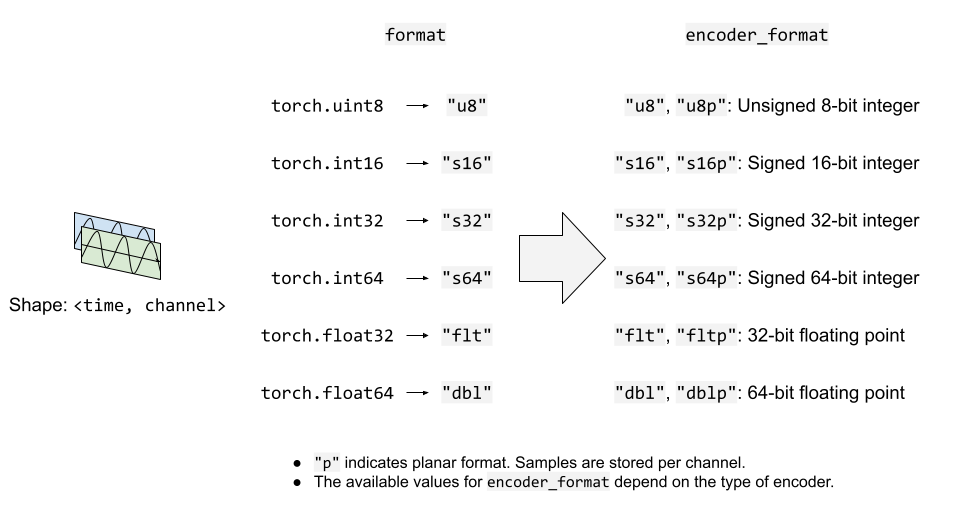
By default, audio streams expect the input waveform tensors to be torch.float32 type.
If the above case, the data will be encoded into the detault encoding format of WAV format,
which is 16-bit signed integer Linear PCM. StreamWriter converts the sample format internally.
If the encoder supports multiple sample formats and you want to change the encoder sample format,
you can use encoder_format option.
In the following example, the StreamWriter expects the data type of the input waveform Tensor
to be torch.float32, but it will convert the sample to 16-bit signed integer when encoding.
s = StreamWriter("audio.mp3")
s.add_audio_stream(
    ...,
    encoder="libmp3lame",   # "libmp3lame" is often the default encoder for mp3,
                            # but specifying it manually, for the sake of illustration.

    encoder_format="s16p",  # "libmp3lame" encoder supports the following sample format.
                            #  - "s16p" (16-bit signed integer)
                            #  - "s32p" (32-bit signed integer)
                            #  - "fltp" (32-bit floating point)
)
If the data type of your waveform Tensor is something other than torch.float32,
you can provide format option to change the expected data type.
The following example configures StreamWriter to expect Tensor of torch.int16 type.
# Audio data passed to StreamWriter must be torch.int16
s.add_audio_stream(..., format="s16")
The following figure illustrates how format and encoder_format options work
for audio streams.

Video Stream
To add a still image or a video stream, you can use
add_video_stream() method.
At minimum, frame_rate, height and width are required.
s = StreamWriter("video.mp4")
s.add_video_stream(frame_rate=10, height=96, width=128)
For still images, please use frame_rate=1.
s = StreamWriter("image.png")
s.add_video_stream(frame_rate=1, ...)
Similar to the audio stream, you can provide format and encoder_format
option to controll the format of input data and encoding.
The following example encodes video data in YUV422 format.
s = StreamWriter("video.mov")
s.add_video_stream(
    ...,
    encoder="libx264",  # libx264 supports different YUV formats, such as
                        # yuv420p yuvj420p yuv422p yuvj422p yuv444p yuvj444p nv12 nv16 nv21

    encoder_format="yuv422p",  # StreamWriter will convert the input data to YUV422 internally
)
YUV formats are commonly used in video encoding. Many YUV formats are composed of chroma
channel of different plane size than that of luma channel. This makes it difficult to
directly express it as torch.Tensor type.
Therefore, StreamWriter will automatically convert the input video Tensor into the target format.
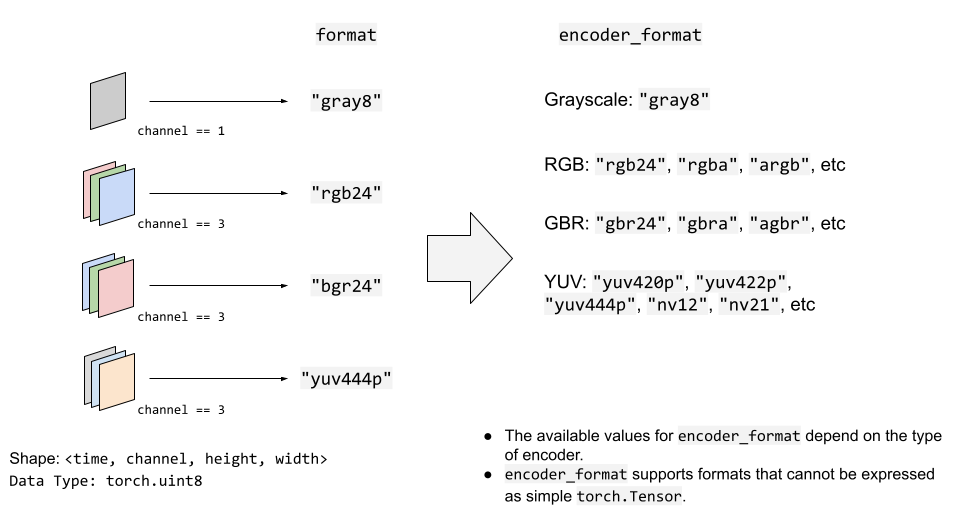
StreamWriter expects the input image tensor to be 4-D (time, channel, height, width)
and torch.uint8 type.
The default color channel is RGB. That is three color channels corresponding red, green and blue.
If your input has different color channel, such as BGR and YUV, you can specify it with
format option.
The following example specifies BGR format.
s.add_video_stream(..., format="bgr24")
                   # Image data passed to StreamWriter must have
                   # three color channels representing Blue Green Red.
                   #
                   # The shape of the input tensor has to be
                   # (time, channel==3, height, width)
The following figure illustrates how format and encoder_format options work for
video streams.

Write data
Once streams are configured, the next step is to open the output location and start writing data.
Use open() method to open the
destination, and then write data with write_audio_chunk()
and/or write_video_chunk().
Audio tensors are expected to have the shape of (time, channels), and video/image tensors are expected to have the shape of (time, channels, height, width).
Channels, height and width must match the configuration of the corresponding
stream, specified with "format" option.
Tensor representing a still image must have only one frame in time dimension, but audio and video tensors can have arbitral number of frames in time dimension.
The following code snippet illustrates this;
Ex) Audio
# Configure stream
s = StreamWriter(dst=get_path("audio.wav"))
s.add_audio_stream(sample_rate=SAMPLE_RATE, num_channels=NUM_CHANNELS)

# Write data
with s.open():
    s.write_audio_chunk(0, WAVEFORM)
Ex) Image
# Image config
height = 96
width = 128

# Configure stream
s = StreamWriter(dst=get_path("image.png"))
s.add_video_stream(frame_rate=1, height=height, width=width, format="rgb24")

# Generate image
chunk = torch.randint(256, (1, 3, height, width), dtype=torch.uint8)

# Write data
with s.open():
    s.write_video_chunk(0, chunk)
Ex) Video without audio
# Video config
frame_rate = 30
height = 96
width = 128

# Configure stream
s = StreamWriter(dst=get_path("video.mp4"))
s.add_video_stream(frame_rate=frame_rate, height=height, width=width, format="rgb24")

# Generate video chunk (3 seconds)
time = int(frame_rate * 3)
chunk = torch.randint(256, (time, 3, height, width), dtype=torch.uint8)

# Write data
with s.open():
    s.write_video_chunk(0, chunk)
Ex) Video with audio
To write video with audio, separate streams have to be configured.
# Configure stream
s = StreamWriter(dst=get_path("video.mp4"))
s.add_audio_stream(sample_rate=SAMPLE_RATE, num_channels=NUM_CHANNELS)
s.add_video_stream(frame_rate=frame_rate, height=height, width=width, format="rgb24")

# Generate audio/video chunk (3 seconds)
time = int(SAMPLE_RATE * 3)
audio_chunk = torch.randn((time, NUM_CHANNELS))
time = int(frame_rate * 3)
video_chunk = torch.randint(256, (time, 3, height, width), dtype=torch.uint8)

# Write data
with s.open():
    s.write_audio_chunk(0, audio_chunk)
    s.write_video_chunk(1, video_chunk)
Writing data chunk by chunk
When writing data, it is possible to split data along time dimension and write them by smaller chunks.
# Write data in one-go
dst1 = io.BytesIO()
s = StreamWriter(dst=dst1, format="mp3")
s.add_audio_stream(SAMPLE_RATE, NUM_CHANNELS)
with s.open():
    s.write_audio_chunk(0, WAVEFORM)
# Write data in smaller chunks
dst2 = io.BytesIO()
s = StreamWriter(dst=dst2, format="mp3")
s.add_audio_stream(SAMPLE_RATE, NUM_CHANNELS)
with s.open():
    for start in range(0, NUM_FRAMES, SAMPLE_RATE):
        end = start + SAMPLE_RATE
        s.write_audio_chunk(0, WAVEFORM[start:end, ...])
bytes1: 10701
b'ID3\x04\x00\x00\x00\x00\x00#'...b'\xaa\xaa\xaa\xaa\xaa\xaa\xaa\xaa\xaa\xaa'

bytes2: 10701
b'ID3\x04\x00\x00\x00\x00\x00#'...b'\xaa\xaa\xaa\xaa\xaa\xaa\xaa\xaa\xaa\xaa'
Note on slicing and AAC
Warning
FFmpeg’s native AAC encoder (which is used by default when saving video with MP4 format) has a bug that affects the audibility.
Please refer to the examples bellow.
def test_slice(audio_encoder, slice_size, ext="mp4"):
    path = get_path(f"slice_{slice_size}.{ext}")

    s = StreamWriter(dst=path)
    s.add_audio_stream(SAMPLE_RATE, NUM_CHANNELS, encoder=audio_encoder)
    with s.open():
        for start in range(0, NUM_FRAMES, slice_size):
            end = start + slice_size
            s.write_audio_chunk(0, WAVEFORM[start:end, ...])
    return path
This causes some artifacts.
# note:
# Chrome does not support playing AAC audio directly while Safari does.
# Using MP4 container and specifying AAC allows Chrome to play it.
Video(test_slice(audio_encoder="aac", slice_size=8000, ext="mp4"), embed=True)
It is more noticeable when using smaller slice.
Video(test_slice(audio_encoder="aac", slice_size=512, ext="mp4"), embed=True)
Lame MP3 encoder works fine for the same slice size.
Audio(test_slice(audio_encoder="libmp3lame", slice_size=512, ext="mp3"))
Example - Spectrum Visualizer
In this section, we use StreamWriter to create a spectrum visualization of audio and save it as a video file.
To create spectrum visualization, we use
torchaudio.transforms.Spectrogram, to get spectrum presentation
of audio, generate raster images of its visualization using matplotplib,
then use StreamWriter to convert them to video with the original audio.
import torchaudio.transforms as T
import matplotlib.pyplot as plt
Prepare Data
First, we prepare the spectrogram data.
We use Spectrogram.
We adjust hop_length so that one frame of the spectrogram corresponds
to one video frame.
frame_rate = 20
n_fft = 4000

trans = T.Spectrogram(
    n_fft=n_fft,
    hop_length=SAMPLE_RATE // frame_rate,  # One FFT per one video frame
    normalized=True,
    power=1,
)
specs = trans(WAVEFORM.T)[0].T
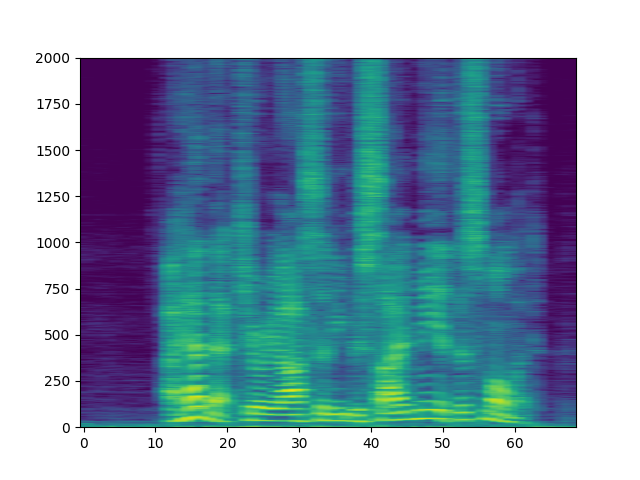
The resulting spectrogram looks like the following.
spec_db = T.AmplitudeToDB(stype="magnitude", top_db=80)(specs.T)
_ = plt.imshow(spec_db, aspect="auto", origin='lower')

Prepare Canvas
We use matplotlib to visualize the spectrogram per frame.
We create a helper function that plots the spectrogram data and
generates a raster imager of the figure.
fig, ax = plt.subplots(figsize=[3.2, 2.4])
ax.set_position([0, 0, 1, 1])
ax.set_facecolor("black")
ncols, nrows = fig.canvas.get_width_height()


def _plot(data):
    ax.clear()
    x = list(range(len(data)))
    R, G, B = 238/255, 76/255, 44/255
    for coeff, alpha in [(0.8, 0.7), (1, 1)]:
        d = data ** coeff
        ax.fill_between(x, d, -d, color=[R, G, B, alpha])
    xlim = n_fft // 2 + 1
    ax.set_xlim([-1, n_fft // 2 + 1])
    ax.set_ylim([-1, 1])
    ax.text(
        xlim, 0.95,
        f"Created with TorchAudio\n{torchaudio.__version__}",
        color="white", ha="right", va="top", backgroundcolor="black")
    fig.canvas.draw()
    frame = torch.frombuffer(fig.canvas.tostring_rgb(), dtype=torch.uint8)
    return frame.reshape(nrows, ncols, 3).permute(2, 0, 1)

# sphinx_gallery_defer_figures
Write Video
Finally, we use StreamWriter and write video. We process one second of audio and video frames at a time.
s = StreamWriter(get_path("example.mp4"))
s.add_audio_stream(sample_rate=SAMPLE_RATE, num_channels=NUM_CHANNELS)
s.add_video_stream(frame_rate=frame_rate, height=nrows, width=ncols)

with s.open():
    i = 0
    # Process by second
    for t in range(0, NUM_FRAMES, SAMPLE_RATE):
        # Write audio chunk
        s.write_audio_chunk(0, WAVEFORM[t:t + SAMPLE_RATE, :])

        # write 1 second of video chunk
        frames = [_plot(spec) for spec in specs[i:i+frame_rate]]
        if frames:
            s.write_video_chunk(1, torch.stack(frames))
        i += frame_rate

plt.close(fig)
/root/project/examples/tutorials/streamwriter_basic_tutorial.py:626: UserWarning: The given buffer is not writable, and PyTorch does not support non-writable tensors. This means you can write to the underlying (supposedly non-writable) buffer using the tensor. You may want to copy the buffer to protect its data or make it writable before converting it to a tensor. This type of warning will be suppressed for the rest of this program. (Triggered internally at /opt/conda/conda-bld/pytorch_1670525552411/work/torch/csrc/utils/tensor_new.cpp:1563.)
  frame = torch.frombuffer(fig.canvas.tostring_rgb(), dtype=torch.uint8)
Result
The result looks like below.
Video(get_path("example.mp4"), embed=True)
Carefully watching the video, it can be observed that the sound of “s” (curiosity, besides, this) has more energy allocated on higher frequency side (right side of the video).
Tag: torchaudio.io
Total running time of the script: ( 0 minutes 7.035 seconds)


