Pipeline Parallelism
Pipeline parallelism was original introduced in the Gpipe paper and is an efficient technique to train large models on multiple GPUs.
Warning
Pipeline Parallelism is experimental and subject to change.
Model Parallelism using multiple GPUs
Typically for large models which don’t fit on a single GPU, model parallelism is employed where certain parts of the model are placed on different GPUs. Although, if this is done naively for sequential models, the training process suffers from GPU under utilization since only one GPU is active at one time as shown in the figure below:
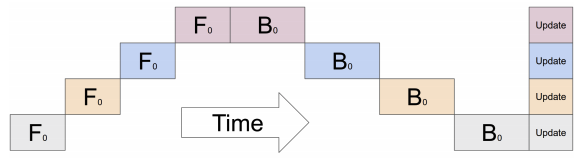
The figure represents a model with 4 layers placed on 4 different GPUs (vertical axis). The horizontal axis represents training this model through time demonstrating that only 1 GPU is utilized at a time (image source).
Pipelined Execution
To alleviate this problem, pipeline parallelism splits the input minibatch into multiple microbatches and pipelines the execution of these microbatches across multiple GPUs. This is outlined in the figure below:
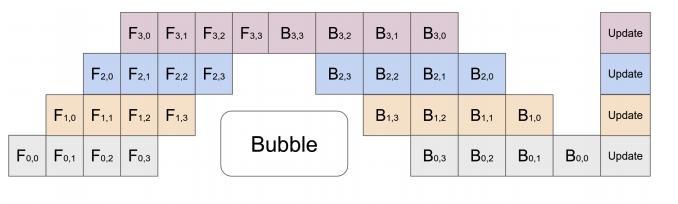
The figure represents a model with 4 layers placed on 4 different GPUs (vertical axis). The horizontal axis represents training this model through time demonstrating that the GPUs are utilized much more efficiently. However, there still exists a bubble (as demonstrated in the figure) where certain GPUs are not utilized. (image source).
Pipe APIs in PyTorch
-
class
torch.distributed.pipeline.sync.Pipe(module, chunks=1, checkpoint='except_last', deferred_batch_norm=False)[source] Wraps an arbitrary
nn.Sequentialmodule to train on using synchronous pipeline parallelism. If the module requires lots of memory and doesn’t fit on a single GPU, pipeline parallelism is a useful technique to employ for training.The implementation is based on the torchgpipe paper.
Pipe combines pipeline parallelism with checkpointing to reduce peak memory required to train while minimizing device under-utilization.
You should place all the modules on the appropriate devices and wrap them into an
nn.Sequentialmodule defining the desired order of execution. If a module does not contain any parameters/buffers, it is assumed this module should be executed on CPU and appropriate input tensors to the module are moved to CPU before execution. This behavior can be overridden by theWithDevicewrapper which can be used to explicitly specify which device a module should run on.- Parameters
module (
nn.Sequential) – sequential module to be parallelized using pipelining. Each module in the sequence has to have all of its parameters on a single device. Each module in the sequence has to either be an nn.Module ornn.Sequential(to combine multiple sequential modules on a single device)chunks (int) – number of micro-batches (default:
1)checkpoint (str) – when to enable checkpointing, one of
'always','except_last', or'never'(default:'except_last').'never'disables checkpointing completely,'except_last'enables checkpointing for all micro-batches except the last one and'always'enables checkpointing for all micro-batches.deferred_batch_norm (bool) – whether to use deferred
BatchNormmoving statistics (default:False). If set toTrue, we track statistics across multiple micro-batches to update the running statistics per mini-batch.
- Raises
TypeError – the module is not a
nn.Sequential.ValueError – invalid arguments
- Example::
Pipeline of two FC layers across GPUs 0 and 1.
>>> # Need to initialize RPC framework first.
>>> os.environ['MASTER_ADDR'] = 'localhost'
>>> os.environ['MASTER_PORT'] = '29500'
>>> torch.distributed.rpc.init_rpc('worker', rank=0, world_size=1)
>>>
>>> # Build pipe.
>>> fc1 = nn.Linear(16, 8).cuda(0)
>>> fc2 = nn.Linear(8, 4).cuda(1)
>>> model = nn.Sequential(fc1, fc2)
>>> model = Pipe(model, chunks=8)
>>> input = torch.rand(16, 16).cuda(0)
>>> output_rref = model(input)
Note
You can wrap a
Pipemodel withtorch.nn.parallel.DistributedDataParallelonly when the checkpoint parameter ofPipeis'never'.Note
Pipeonly supports intra-node pipelining currently, but will be expanded to support inter-node pipelining in the future. The forward function returns anRRefto allow for inter-node pipelining in the future, where the output might be on a remote host. For intra-node pipelinining you can uselocal_value()to retrieve the output locally.Warning
Pipeis experimental and subject to change.-
forward(*inputs)[source] Processes a single input mini-batch through the pipe and returns an
RRefpointing to the output.Pipeis a fairly transparent module wrapper. It doesn’t modify the input and output signature of the underlying module. But there’s type restriction. Input and output have to contain at least one tensor. This restriction is applied at partition boundaries too.The sequence of inputs are fed into the first stage of the pipeline as
*inputs. As a result the positional args for this function should match the positional args for the first stage of the pipeline. The same condition applies for output of one stage of the pipeline which is the input for the next stage.The input tensor is split into multiple micro-batches based on the
chunksparameter used to initializePipe. The batch size is assumed to be the first dimension of the tensor and if the batch size is less thanchunks, the number of micro-batches is equal to the batch size.Only tensors are split into multiple micro-batches, non-Tensor inputs are just replicated as-is in each micro-batch. For non-Tensor outputs in the last stage of the pipeline, they are aggregated as a
Listand returned the user. For example, if you have 2 micro-batches returning the integer 5, the user would receive the consolidated output of [5, 5]All the input tensors need to be on the same device as the first partition of the pipeline.
If a tensor is wrapped with the
NoChunkwrapper, the tensor is not split across micro-batches and is replicated as-is similar to non-tensors.
Skip connections
Certain models like ResNeXt are not completely sequential and have skip connections between layers. Naively implementing as part of pipeling parallelism would imply that we need to copy outputs for certain layers through multiple GPUs till we eventually reach the GPU where the layer for the skip connection resides. To avoid this copy overhead, we provide APIs below to stash and pop Tensors in different layers of the model.
-
torch.distributed.pipeline.sync.skip.skippable.skippable(stash=(), pop=())[source] The decorator to define a
nn.Modulewith skip connections. Decorated modules are called “skippable”. This functionality works perfectly fine even when the module is not wrapped byPipe.Each skip tensor is managed by its name. Before manipulating skip tensors, a skippable module must statically declare the names for skip tensors by stash and/or pop parameters. Skip tensors with pre-declared name can be stashed by
yield stash(name, tensor)or popped bytensor = yield pop(name).Here is an example with three layers. A skip tensor named “1to3” is stashed and popped at the first and last layer, respectively:
@skippable(stash=['1to3'])
class Layer1(nn.Module):
    def forward(self, input):
        yield stash('1to3', input)
        return f1(input)

class Layer2(nn.Module):
    def forward(self, input):
        return f2(input)

@skippable(pop=['1to3'])
class Layer3(nn.Module):
    def forward(self, input):
        skip_1to3 = yield pop('1to3')
        return f3(input) + skip_1to3

model = nn.Sequential(Layer1(), Layer2(), Layer3())
One skippable module can stash or pop multiple skip tensors:
@skippable(stash=['alice', 'bob'], pop=['carol'])
class StashStashPop(nn.Module):
    def forward(self, input):
        yield stash('alice', f_alice(input))
        yield stash('bob', f_bob(input))
        carol = yield pop('carol')
        return input + carol
Every skip tensor must be associated with exactly one pair of stash and pop.
Pipechecks this restriction automatically when wrapping a module. You can also check the restriction byverify_skippables()withoutPipe.
-
class
torch.distributed.pipeline.sync.skip.skippable.stash(name, tensor)[source] The command to stash a skip tensor.
def forward(self, input):
    yield stash('name', input)
    return f(input)
- Parameters
name (str) – name of skip tensor
input (torch.Tensor or None) – tensor to pass to the skip connection
-
class
torch.distributed.pipeline.sync.skip.skippable.pop(name)[source] The command to pop a skip tensor.
def forward(self, input):
    skip = yield pop('name')
    return f(input) + skip
- Parameters
name (str) – name of skip tensor
- Returns
the skip tensor previously stashed by another layer under the same name
-
torch.distributed.pipeline.sync.skip.skippable.verify_skippables(module)[source] Verifies if the underlying skippable modules satisfy integrity.
Every skip tensor must have only one pair of stash and pop. If there are one or more unmatched pairs, it will raise
TypeErrorwith the detailed messages.Here are a few failure cases.
verify_skippables()will report failure for these cases:# Layer1 stashes "1to3". # Layer3 pops "1to3". nn.Sequential(Layer1(), Layer2()) # └──── ? nn.Sequential(Layer2(), Layer3()) # ? ────┘ nn.Sequential(Layer1(), Layer2(), Layer3(), Layer3()) # └───────────────────┘ ^^^^^^ nn.Sequential(Layer1(), Layer1(), Layer2(), Layer3()) # ^^^^^^ └───────────────────┘
To use the same name for multiple skip tensors, they must be isolated by different namespaces. See
isolate().- Raises
TypeError – one or more pairs of stash and pop are not matched.
Tutorials
The following tutorials give a good overview of how to use the
Pipe API to train your models with the
rest of the components that PyTorch provides:
Acknowledgements
The implementation for pipeline parallelism is based on fairscale’s pipe implementation and torchgpipe. We would like to thank both teams for their contributions and guidance towards bringing pipeline parallelism into PyTorch.
