Introduction
FX based feature extraction is a new TorchVision utility that lets us access intermediate transformations of an input during the forward pass of a PyTorch Module. It does so by symbolically tracing the forward method to produce a graph where each node represents a single operation. Nodes are named in a human-readable manner such that one may easily specify which nodes they want to access.
Did that all sound a little complicated? Not to worry as there’s a little in this article for everyone. Whether you’re a beginner or an advanced deep-vision practitioner, chances are you will want to know about FX feature extraction. If you still want more background on feature extraction in general, read on. If you’re already comfortable with that and want to know how to do it in PyTorch, skim ahead to Existing Methods in PyTorch: Pros and Cons. And if you already know about the challenges of doing feature extraction in PyTorch, feel free to skim forward to FX to The Rescue.
A Recap On Feature Extraction
We’re all used to the idea of having a deep neural network (DNN) that takes inputs and produces outputs, and we don’t necessarily think of what happens in between. Let’s just consider a ResNet-50 classification model as an example:
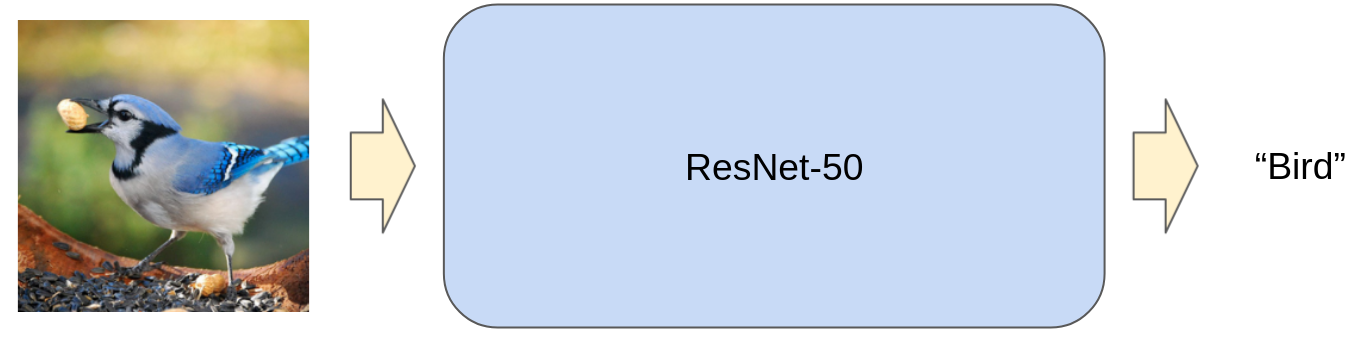
Figure 1: ResNet-50 takes an image of a bird and transforms that into the abstract concept “bird”. Source: Bird image from ImageNet.
We know though, that there are many sequential “layers” within the ResNet-50 architecture that transform the input step-by-step. In Figure 2 below, we peek under the hood to show the layers within ResNet-50, and we also show the intermediate transformations of the input as it passes through those layers.
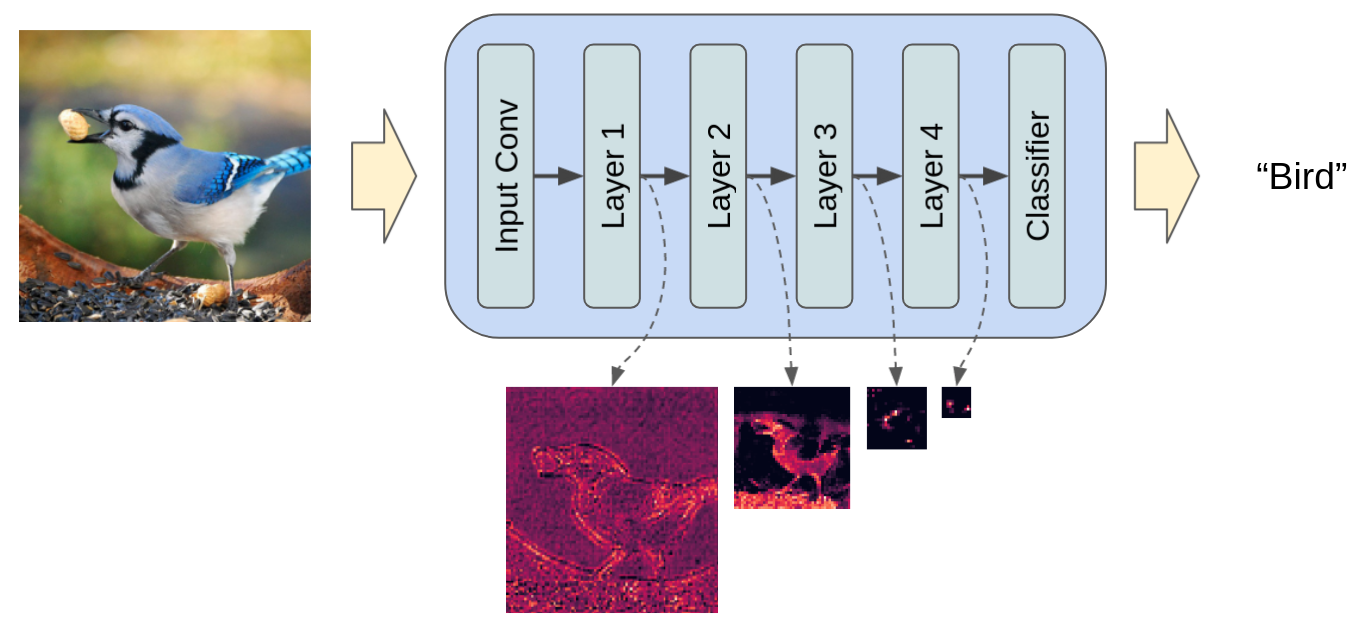
Figure 2: ResNet-50 transforms the input image in multiple steps. Conceptually, we may access the intermediate transformation of the image after each one of these steps. Source: Bird image from ImageNet.
Existing Methods In PyTorch: Pros and Cons
There were already a few ways of doing feature extraction in PyTorch prior to FX based feature extraction being introduced.
To illustrate these, let’s consider a simple convolutional neural network that does the following
- Applies several “blocks” each with several convolution layers within.
- After several blocks, it uses a global average pool and flatten operation.
- Finally it uses a single output classification layer.
import torch
from torch import nn


class ConvBlock(nn.Module):
   """
   Applies `num_layers` 3x3 convolutions each followed by ReLU then downsamples
   via 2x2 max pool.
   """

   def __init__(self, num_layers, in_channels, out_channels):
       super().__init__()
       self.convs = nn.ModuleList(
           [nn.Sequential(
               nn.Conv2d(in_channels if i==0 else out_channels, out_channels, 3, padding=1),
               nn.ReLU()
            )
            for i in range(num_layers)]
       )
       self.downsample = nn.MaxPool2d(kernel_size=2, stride=2)

   def forward(self, x):
       for conv in self.convs:
           x = conv(x)
       x = self.downsample(x)
       return x


class CNN(nn.Module):
   """
   Applies several ConvBlocks each doubling the number of channels, and
   halving the feature map size, before taking a global average and classifying.
   """

   def __init__(self, in_channels, num_blocks, num_classes):
       super().__init__()
       first_channels = 64
       self.blocks = nn.ModuleList(
           [ConvBlock(
               2 if i==0 else 3,
               in_channels=(in_channels if i == 0 else first_channels*(2**(i-1))),
               out_channels=first_channels*(2**i))
            for i in range(num_blocks)]
       )
       self.global_pool = nn.AdaptiveAvgPool2d((1, 1))
       self.cls = nn.Linear(first_channels*(2**(num_blocks-1)), num_classes)

   def forward(self, x):
       for block in self.blocks:
           x = block(x)
       x = self.global_pool(x)
       x = x.flatten(1)
       x = self.cls(x)
       return x


model = CNN(3, 4, 10)
out = model(torch.zeros(1, 3, 32, 32))  # This will be the final logits over classes
Let’s say we want to get the final feature map before global average pooling. We could do the following:
Modify the forward method
def forward(self, x):
   for block in self.blocks:
       x = block(x)
   self.final_feature_map = x
   x = self.global_pool(x)
   x = x.flatten(1)
   x = self.cls(x)
   return x
Or return it directly:
def forward(self, x):
   for block in self.blocks:
       x = block(x)
   final_feature_map = x
   x = self.global_pool(x)
   x = x.flatten(1)
   x = self.cls(x)
   return x, final_feature_map
That looks pretty easy. But there are some downsides here which all stem from the same underlying issue: that is, modifying the source code is not ideal:
- It’s not always easy to access and change given the practical considerations of a project.
- If we want flexibility (switching feature extraction on or off, or having variations on it), we need to further adapt the source code to support that.
- It’s not always just a question of inserting a single line of code. Think about how you would go about getting the feature map from one of the intermediate blocks with the way I’ve written this module.
- Overall, we’d rather avoid the overhead of maintaining source code for a model, when we actually don’t need to change anything about how it works.
One can see how this downside can start to get a lot more thorny when dealing with larger, more complicated models, and trying to get at features from within nested submodules.
Write a new module using the parameters from the original one
Following on the example from above, say we want to get a feature map from each block. We could write a new module like so:
class CNNFeatures(nn.Module):
   def __init__(self, backbone):
       super().__init__()
       self.blocks = backbone.blocks

   def forward(self, x):
       feature_maps = []
       for block in self.blocks:
           x = block(x)
           feature_maps.append(x)
       return feature_maps


backbone = CNN(3, 4, 10)
model = CNNFeatures(backbone)
out = model(torch.zeros(1, 3, 32, 32))  # This is now a list of Tensors, each representing a feature map
In fact, this is much like the method that TorchVision used internally to make many of its detection models.
Although this approach solves some of the issues with modifying the source code directly, there are still some major downsides:
- It’s only really straight-forward to access the outputs of top-level submodules. Dealing with nested submodules rapidly becomes complicated.
- We have to be careful not to miss any important operations in between the input and the output. We introduce potential for errors in transcribing the exact functionality of the original module to the new module.
Overall, this method and the last both have the complication of tying in feature extraction with the model’s source code itself. Indeed, if we examine the source code for TorchVision models we might suspect that some of the design choices were influenced by the desire to use them in this way for downstream tasks.
Use hooks
Hooks move us away from the paradigm of writing source code, towards one of specifying outputs. Considering our toy CNN example above, and the goal of getting feature maps for each layer, we could use hooks like this:
model = CNN(3, 4, 10)
feature_maps = []  # This will be a list of Tensors, each representing a feature map

def hook_feat_map(mod, inp, out):
	feature_maps.append(out)

for block in model.blocks:
	block.register_forward_hook(hook_feat_map)

out = model(torch.zeros(1, 3, 32, 32))  # This will be the final logits over classes
Now we have full flexibility in terms of accessing nested submodules, and we free ourselves of the responsibilities of fiddling with the source code. But this approach comes with its own downsides:
- We can only apply hooks to modules. If we have functional operations (reshape, view, functional non-linearities, etc) for which we want the outputs, hooks won’t work directly on them.
- We have not modified anything about the source code, so the whole forward pass is executed, regardless of the hooks. If we only need to access early features without any need for the final output, this could result in a lot of useless computation.
- Hooks are not TorchScript friendly.
Here’s a summary of the different methods and their pros/cons:
| Can use source code as is without any modifications or rewriting | Full flexibility in accessing features | Drops unnecessary computational steps | TorchScript friendly | |
|---|---|---|---|---|
| Modify forward method | NO | Technically yes. Depends on how much code you’re willing to write. So in practice, NO. | YES | YES |
| New module that reuses submodules / parameters of original module | NO | Technically yes. Depends on how much code you’re willing to write. So in practice, NO. | YES | YES |
| Hooks | YES | Mostly YES. Only outputs of submodules | NO | NO |
Table 1: The pros (or cons) of some of the existing methods for feature extraction with PyTorch
In the next section of this article, let’s see how we can get YES across the board.
FX to The Rescue
The natural question for some new-starters in Python and coding at this point might be: “Can’t we just point to a line of code and tell Python or PyTorch that we want the result of that line?” For those who have spent more time coding, the reason this can’t be done is clear: multiple operations can happen in one line of code, whether they are explicitly written there, or they are implicit as sub-operations. Just take this simple module as an example:
class MyModule(torch.nn.Module):
    def __init__(self):
        super().__init__()
        self.param = torch.nn.Parameter(torch.rand(3, 4))
        self.submodule = MySubModule()

    def forward(self, x):
        return self.submodule(x + self.param).clamp(min=0.0, max=1.0)
The forward method has a single line of code which we can unravel as:
- Add
self.paramtox - Pass x through self.submodule. Here we would need to consider the steps happening in that submodule. I’m just going to use dummy operation names for illustration: I. submodule.op_1 II. submodule.op_2
- Apply the clamp operation
So even if we point at this one line, the question then is: “For which step do we want to extract the output?”.
FX is a core PyTorch toolkit that (oversimplifying) does the unravelling I just mentioned. It does something called “symbolic tracing”, which means the Python code is interpreted and stepped through, operation-by-operation, using some dummy proxy for a real input. Introducing some nomenclature, each step as described above is considered a “node”, and consecutive nodes are connected to one another to form a “graph” (not unlike the common mathematical notion of a graph). Here are the “steps” above translated to this concept of a graph.
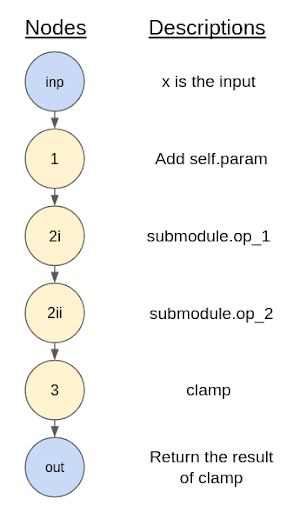
Figure 3: Graphical representation of the result of symbolically tracing our example of a simple forward method.
Note that we call this a graph, and not just a set of steps, because it’s possible for the graph to branch off and recombine. Think of the skip connection in a residual block. This would look something like:

Figure 4: Graphical representation of a residual skip connection. The middle node is like the main branch of a residual block, and the final node represents the sum of the input and output of the main branch.
Now, TorchVision’s get_graph_node_names function applies FX as described above, and in the process of doing so, tags each node with a human readable name. Let’s try this with our toy CNN model from the previous section:
model = CNN(3, 4, 10)
from torchvision.models.feature_extraction import get_graph_node_names
nodes, _ = get_graph_node_names(model)
print(nodes)
which will result in:
['x', 'blocks.0.convs.0.0', 'blocks.0.convs.0.1', 'blocks.0.convs.1.0', 'blocks.0.convs.1.1', 'blocks.0.downsample', 'blocks.1.convs.0.0', 'blocks.1.convs.0.1', 'blocks.1.convs.1.0', 'blocks.1.convs.1.1', 'blocks.1.convs.2.0', 'blocks.1.convs.2.1', 'blocks.1.downsample', 'blocks.2.convs.0.0', 'blocks.2.convs.0.1', 'blocks.2.convs.1.0', 'blocks.2.convs.1.1', 'blocks.2.convs.2.0', 'blocks.2.convs.2.1', 'blocks.2.downsample', 'blocks.3.convs.0.0', 'blocks.3.convs.0.1', 'blocks.3.convs.1.0', 'blocks.3.convs.1.1', 'blocks.3.convs.2.0', 'blocks.3.convs.2.1', 'blocks.3.downsample', 'global_pool', 'flatten', 'cls']
We can read these node names as hierarchically organised “addresses” for the operations of interest. For example ‘blocks.1.downsample’ refers to the MaxPool2d layer in the second ConvBlock.
create_feature_extractor, which is where all the magic happens, goes a few steps further than get_graph_node_names. It takes desired node names as one of the input arguments, and then uses more FX core functionality to:
- Assign the desired nodes as outputs.
- Prune unnecessary downstream nodes and their associated parameters.
- Translate the resulting graph back into Python code.
- Return another PyTorch Module to the user. This has the python code from step 3 as the forward method.
As a demonstration, here’s how we would apply create_feature_extractor to get the 4 feature maps from our toy CNN model
from torchvision.models.feature_extraction import create_feature_extractor
# Confused about the node specification here?
# We are allowed to provide truncated node names, and `create_feature_extractor`
# will choose the last node with that prefix.
feature_extractor = create_feature_extractor(
	model, return_nodes=['blocks.0', 'blocks.1', 'blocks.2', 'blocks.3'])
# `out` will be a dict of Tensors, each representing a feature map
out = feature_extractor(torch.zeros(1, 3, 32, 32))
It’s as simple as that. When it comes down to it, FX feature extraction is just a way of making it possible to do what some of us would have naively hoped for when we first started programming: “just give me the output of this code (points finger at screen)”*.
- … does not require us to fiddle with source code.
- … provides full flexibility in terms of accessing any intermediate transformation of our inputs, whether they are the results of a module or a functional operation
- … does drop unnecessary computations steps once features have been extracted
- … and I didn’t mention this before, but it’s also TorchScript friendly!
Here’s that table again with another row added for FX feature extraction
| Can use source code as is without any modifications or rewriting | Full flexibility in accessing features | Drops unnecessary computational steps | TorchScript friendly | |
|---|---|---|---|---|
| Modify forward method | NO | Technically yes. Depends on how much code you’re willing to write. So in practice, NO. | YES | YES |
| New module that reuses submodules / parameters of original module | NO | Technically yes. Depends on how much code you’re willing to write. So in practice, NO. | YES | YES |
| Hooks | YES | Mostly YES. Only outputs of submodules | NO | NO |
| FX | YES | YES | YES | YES |
Table 2: A copy of Table 1 with an added row for FX feature extraction. FX feature extraction gets YES across the board!
Current FX Limitations
Although I would have loved to end the post there, FX does have some of its own limitations which boil down to:
- There may be some Python code that isn’t yet handled by FX when it comes to the step of interpretation and translation into a graph.
- Dynamic control flow can’t be represented in terms of a static graph.
The easiest thing to do when these problems crop up is to bundle the underlying code into a “leaf node”. Recall the example graph from Figure 3? Conceptually, we may agree that the submodule should be treated as a node in itself rather than a set of nodes representing the underlying operations. If we do so, we can redraw the graph as:
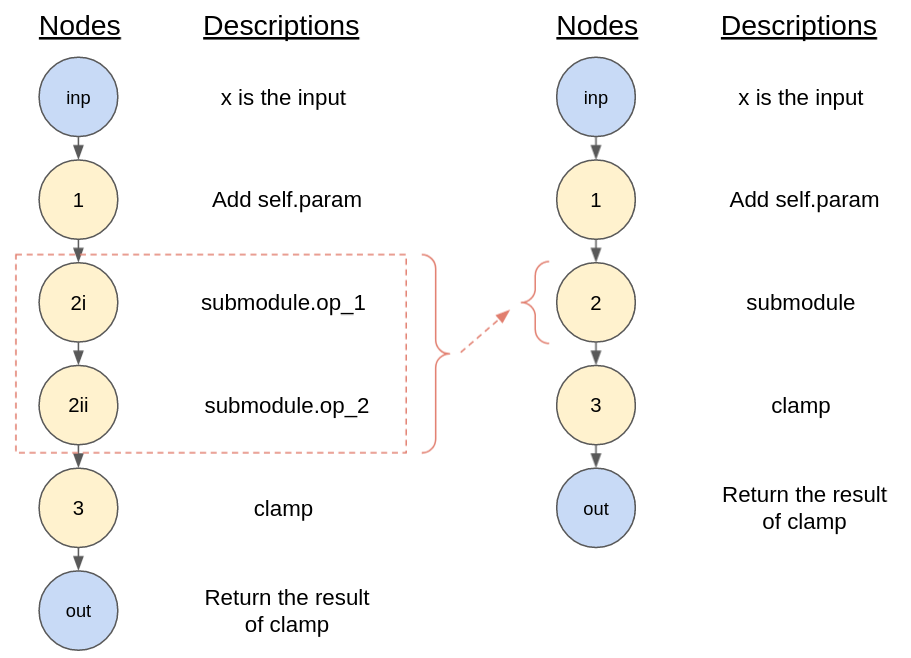
Figure 5: The individual operations within `submodule` may (left – within red box), may be consolidated into one node (right – node #2) if we consider the `submodule` as a “leaf” node.
We would want to do so if there is some problematic code within the submodule, but we don’t have any need for extracting any intermediate transformations from within it. In practice, this is easily achievable by providing a keyword argument to create_feature_extractor or get_graph_node_names.
model = CNN(3, 4, 10)
nodes, _ = get_graph_node_names(model, tracer_kwargs={'leaf_modules': [ConvBlock]})
print(nodes)
for which the output will be:
['x', 'blocks.0', 'blocks.1', 'blocks.2', 'blocks.3', 'global_pool', 'flatten', 'cls']
Notice how, as compared to previously, all the nodes for any given ConvBlock are consolidated into a single node.
We could do something similar with functions. For example, Python’s inbuilt len needs to be wrapped and the result should be treated as a leaf node. Here’s how you can do that with core FX functionality:
torch.fx.wrap('len')

class MyModule(nn.Module):
   def forward(self, x):
       x += 1
       len(x)

model = MyModule()
feature_extractor = create_feature_extractor(model, return_nodes=['add'])
For functions you define, you may instead use another keyword argument to create_feature_extractor (minor detail: here’s why you might want to do it this way instead):
def myfunc(x):
   return len(x)

class MyModule(nn.Module):
   def forward(self, x):
       x += 1
       myfunc(x)

model = MyModule()
feature_extractor = create_feature_extractor(
   model, return_nodes=['add'], tracer_kwargs={'autowrap_functions': [myfunc]})
Notice that none of the fixes above involved modifying source code.
Of course, there may be times when the very intermediate transformation one is trying to get access to is within the same forward method or function that is causing problems. Here, we can’t just treat that module or function as a leaf node, because then we can’t access the intermediate transformations within. In these cases, some rewriting of the source code will be needed. Here are some examples (not exhaustive)
- FX will raise an error when trying to trace through code with an
assertstatement. In this case you may need to remove that assertion or switch it withtorch._assert(this is not a public function – so consider it a bandaid and use with caution). - Symbolically tracing in-place changes to slices of tensors is not supported. You will need to make a new variable for the slice, apply the operation, then reconstruct the original tensor using concatenation or stacking.
- Representing dynamic control flow in a static graph is just not logically possible. See if you can distill the coded logic down to something that is not dynamic – see FX documentation for tips.
In general, you may consult the FX documentation for more detail on the limitations of symbolic tracing and the possible workarounds.
Conclusion
We did a quick recap on feature extraction and why one might want to do it. Although there are existing methods for doing feature extraction in PyTorch they all have rather significant shortcomings. We learned how TorchVision’s FX feature extraction utility works and what makes it so versatile compared to the existing methods. While there are still some minor kinks to iron out for the latter, we understand the limitations, and can trade them off against the limitations of other methods depending on our use case. Hopefully by adding this new utility to your PyTorch toolkit, you’re now equipped to handle the vast majority of feature extraction requirements you may come across.
Happy coding!